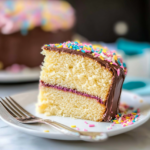
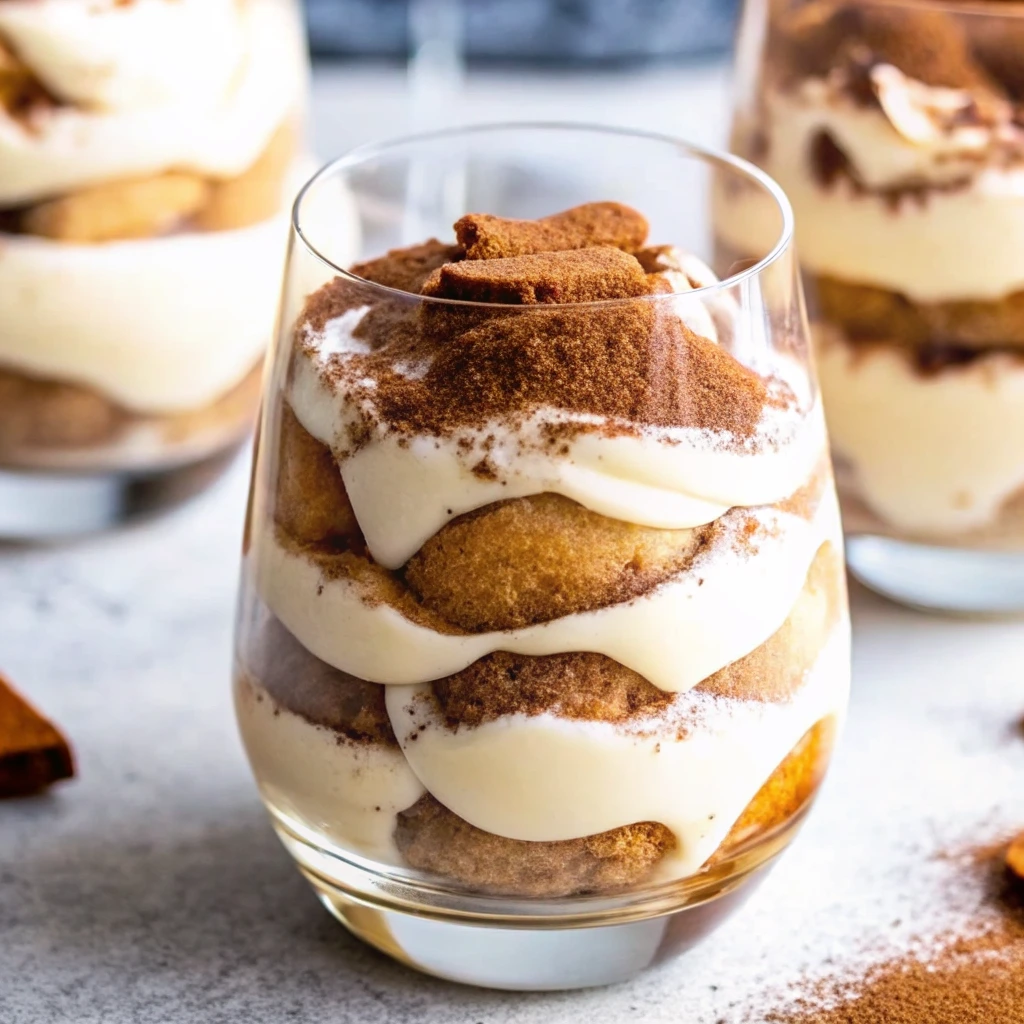
Tiramisu cups are more than just a dessert—they’re a spoonful of elegance, a chilled, layered delight that transforms the classic Italian favorite into perfectly portioned indulgence.
I’m Mary, and here in Bath, I’ve somehow earned the name “The Pudding Lady.” It started in my mother’s pantry—the golden syrup sticky, the flour tins heavy, and the oven always in use. My childhood was filled with the scent of warm sponge cakes, the thrill of licking the spoon, and stolen sugar cubes I thought no one noticed. She taught me something essential: a proper pudding can fix just about anything.
Though I never trained as a pastry chef (I was too ambitious and far too clumsy for that), I baked. Oh, how I baked. Crumbly Victoria sponges, glistening treacle puddings, and mince pies that made even grown-ups nostalgic. My bakes made their way to school fundraisers and village fêtes. Eventually, someone said, “You should teach people how to make these.” And so I did.
Now, I host a quiet little pudding club from my home kitchen—just six of us, surrounded by mismatched teacups and dustings of flour. It’s here that I first introduced tiramisu cups—a pudding so simple, so elegant, it quickly became a favorite. Each cup is rich, creamy, and just the right size to satisfy a craving without guilt.
In this article, I’ll walk you through everything you need to know to make show-stopping tiramisu cups—from layering tips and flavor variations to common mistakes and why glass cups make all the difference.
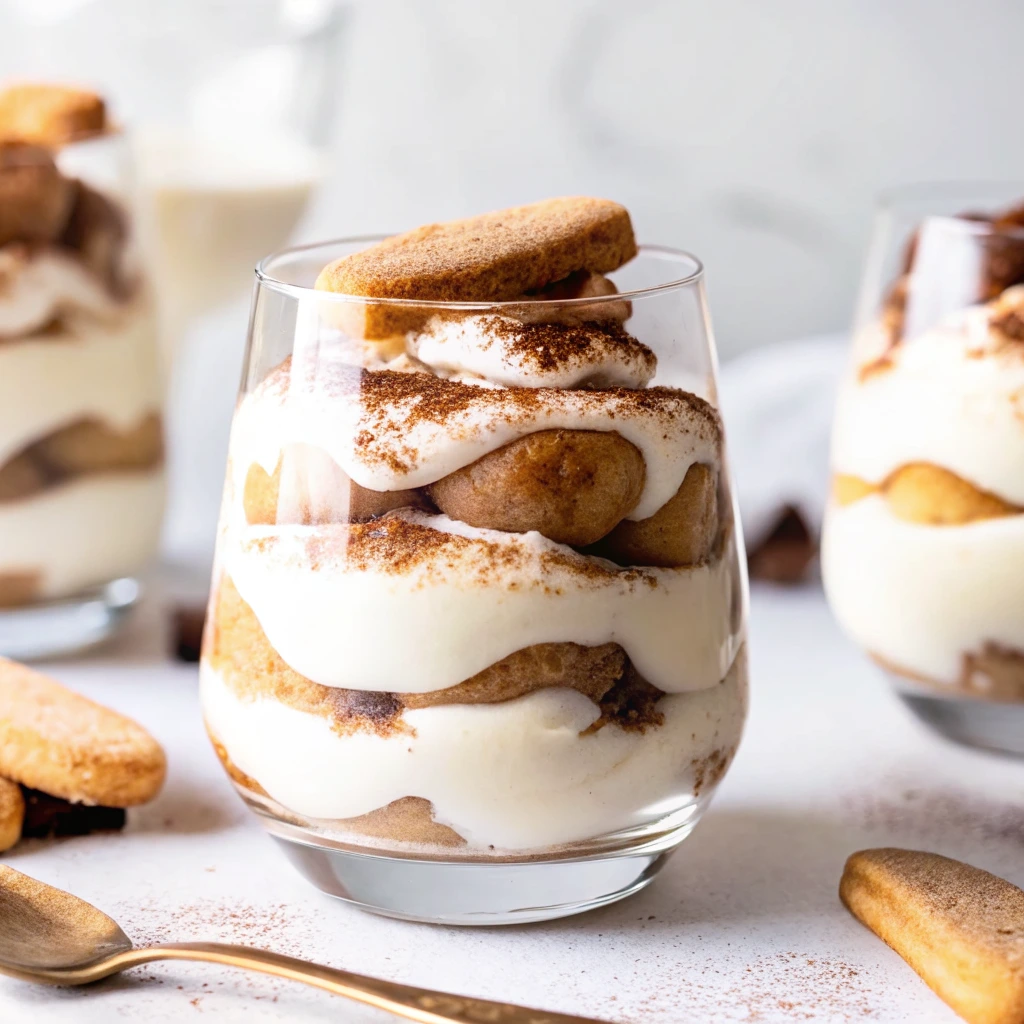
Table of Contents
Table of Contents
What Are Tiramisu Cups and Why Are They So Popular?
Understanding the Concept of Tiramisu in Individual Cups
Tiramisu cups reinvent the classic Italian dessert in a stylish, individual format. Rather than being made in a large baking dish, this version is assembled in individual glass cups or jars. Each cup is layered with espresso-dipped ladyfingers and rich mascarpone cream, then topped with a dusting of cocoa or chocolate shavings.
This dessert keeps all the signature flavors of traditional tiramisu—bold coffee, creamy filling, and a slight hint of cocoa—but in a more personal, portable form. It’s perfect for portion control, presentation, and practicality.
Print
Tiramisu Cups
- Total Time: 4 heures 20 minutes
- Yield: 6 verrines 1x
Description
Des coupes individuelles de tiramisu, crémeuses et élégantes, parfaites pour un dessert raffiné.
Ingredients
- 250g de mascarpone
- 3 œufs
- 100g de sucre
- 1 sachet de sucre vanillé
- 150ml de café fort refroidi
- 1 cuillère à soupe de liqueur (amaretto ou rhum)
- 12 biscuits à la cuillère
- Cacao en poudre non sucré
Instructions
- Séparer les blancs des jaunes d’œufs.
- Fouetter les jaunes avec le sucre et le sucre vanillé jusqu’à ce que le mélange blanchisse.
- Ajouter le mascarpone et bien mélanger.
- Monter les blancs en neige ferme et les incorporer délicatement à la préparation.
- Mélanger le café avec la liqueur dans une assiette creuse.
- Couper les biscuits à la cuillère pour les adapter aux verrines.
- Tremper rapidement chaque morceau dans le café puis disposer au fond des verrines.
- Ajouter une couche de crème, répéter l’opération une fois.
- Réfrigérer pendant au moins 4 heures.
- Saupoudrer de cacao avant de servir.
Notes
Utilisez un bon café fort et évitez de trop imbiber les biscuits pour garder une belle tenue.
- Prep Time: 20 minutes
- Cook Time: 0 minute
- Category: Dessert
- Method: Sans Cuisson
- Cuisine: Italienne
Nutrition
- Serving Size: 1 verrine
- Calories: 320
- Sugar: 18g
- Sodium: 70mg
- Fat: 20g
- Saturated Fat: 12g
- Unsaturated Fat: 7g
- Trans Fat: 0g
- Carbohydrates: 25g
- Fiber: 1g
- Protein: 6g
- Cholesterol: 110mg
Why Single-Serve Desserts Are Trending in 2025
From weddings to baby showers to weeknight indulgences, individually portioned desserts like tiramisu cups are trending big in 2025. Here’s why:
| Reason | Why It Matters |
|---|---|
| Hygiene | Guests get their own portion—no touching or sharing |
| Aesthetic | See-through glass reveals elegant layers |
| Portability | Perfect for takeaway, meal prep, or gifting |
| Personalization | Easily adjust for diet (e.g., vegan, keto) |
People want desserts that are not just delicious but also Instagram-worthy, and tiramisu cups deliver both.
Benefits of Tiramisu Cups vs Traditional Tiramisu
Here’s how tiramisu cups stack up against their classic counterpart:
- Faster Assembly: Smaller portions mean less time layering and chilling.
- Better Texture Control: Each cup sets individually, avoiding soggy centers.
- Easier to Serve: No messy slicing—just grab a spoon and enjoy.
- Perfect for Make-Ahead: Great for prepping a day or two in advance.
Discover great ideas like these creamy tiramisu cookies: Tiramisu Cookies
Tiramisu cups are ideal for anyone who loves bold flavor and no-fuss serving. Next, let’s take a closer look at the key ingredients that make them unforgettable.
Ingredients You’ll Need for Perfect Tiramisu Cups
Essential Ingredients: Mascarpone, Ladyfingers, Espresso, Cocoa
A flawless tiramisu cup starts with the right ingredients. While the recipe is no-bake and fairly simple, quality matters. Here’s a breakdown of the must-haves:
| Ingredient | Purpose | Notes |
|---|---|---|
| Mascarpone Cheese | Creates the creamy filling | Use full-fat for best texture |
| Ladyfingers (Savoiardi) | Forms the base and structure | Crisp, dry style preferred |
| Espresso or Strong Coffee | Adds bold flavor | Cool before dipping |
| Egg Yolks (Optional) | Traditional richness | Can be skipped in egg-free versions |
| Heavy Cream | Lightens the mascarpone | Whip to soft peaks |
| Granulated Sugar | Sweetens the filling | Adjust to taste |
| Cocoa Powder | Dusting top layer | Use unsweetened Dutch-processed |
| Coffee Liqueur (Optional) | Boosts flavor | Consider Kahlúa, Baileys, or Marsala wine |
Don’t miss our full-sized decadent tiramisu cake recipe: Tiramisu Cake
These ingredients create that signature melt-in-your-mouth feel while delivering deep, rich coffee tones with just enough sweetness to satisfy.
Substitutes for Common Allergens (Dairy-Free, Egg-Free, Gluten-Free)
Want to make your tiramisu cups allergy-friendly? Here are some easy swaps:
| Allergy | Substitution Ideas |
|---|---|
| Dairy | Coconut cream, vegan mascarpone, or tofu-based alternatives |
| Egg | Skip yolks or use aquafaba (chickpea brine) for whipping |
| Gluten | Use gluten-free ladyfingers or almond flour sponge cake |
These alternatives let everyone enjoy tiramisu—without sacrificing flavor or texture.
Best Store-Bought Brands for Tiramisu Cup Ingredients
Looking for shortcuts that don’t compromise quality? Here are a few trusted grocery brands in the U.S. for your tiramisu adventure:
| Ingredient | Recommended Brands |
|---|---|
| Mascarpone | Galbani, BelGioioso, Vermont Creamery |
| Ladyfingers | Alessi, Savoiardi, Vicenzovo |
| Cocoa Powder | Ghirardelli, Hershey’s Special Dark, Valrhona |
| Coffee Liqueur | Kahlúa, Tia Maria, Disaronno (if adding almond twist) |
Using quality ingredients is the easiest way to make your tiramisu cups taste like they came from an upscale Italian café.
Learn more about indulgent chocolate trifles for dessert cups: Chocolate Cheesecake Trifle
Next up? We’re assembling all this deliciousness into layered perfection.
Step-by-Step Recipe for Homemade Tiramisu Cups
Making tiramisu cups at home is easier than you think—no baking required, just a few simple steps. Whether you’re preparing them for a dinner party or meal prepping for the week, this recipe ensures consistent, delicious results every time.
Preparing the Espresso and Cream Layers
Start by prepping the two main components: the coffee soak and the creamy mascarpone filling.
For the Espresso Soak:
- Brew 1 cup of strong espresso or dark roast coffee.
- Allow it to cool completely.
- Add 1–2 tablespoons of coffee liqueur (optional for adults).
For the Mascarpone Cream:
- In a bowl, whip 1 cup of heavy cream until soft peaks form.
- ChatGPT a dit :
- In another bowl, combine 8 oz of mascarpone cheese with ¼ cup of sugar and 1 teaspoon of vanilla extract, mixing until smooth and creamy.
- Gently fold in the whipped cream until smooth and fluffy.
💡 Tip: Make sure your mascarpone is at room temperature to prevent clumping.
Looking for inspiration? Try mini chocolate cakes too: Mini Chocolate Cakes
Assembling the Layers in Glass Cups
Choose clear dessert glasses or jars to show off the layers—it’s not just about taste, it’s about presentation.
- Dip ladyfingers quickly into the cooled espresso. Don’t soak—just a fast dunk to avoid sogginess.
- Place a layer of soaked ladyfingers at the bottom of each cup.
- Add a generous spoonful of the mascarpone mixture.
- Repeat the layers: coffee-soaked ladyfingers, then cream.
- Use the back of a spoon to gently smooth out the surface.
Repeat until each cup is filled just below the rim. Keep your layers clean for that wow-worthy look.
Chilling and Setting: The Ideal Time and Temperature
Tiramisu cups need time to set properly. Here’s how to do it right:
- Cover each cup with plastic wrap to seal in moisture.
- Chill in the refrigerator for a minimum of 6 hours, or ideally overnight, to allow the flavors to fully develop.
- Before serving, dust with unsweetened cocoa powder or shaved chocolate.
| Setting Time | Flavor & Texture |
|---|---|
| 1–2 hours | Soft, slightly runny layers |
| 4–6 hours | More set, flavors begin to meld |
| 8–24 hours | Fully set, rich flavor development |
Once chilled, these cups are perfectly spoonable with layered textures that melt in your mouth.
Discover great ideas like this tres leches cake variation: Tres Leches Cake
Now that you’ve mastered the classic approach, let’s get creative with some drool-worthy variations.
Tiramisu Cup Variations You’ll Love Trying
One of the greatest advantages of tiramisu cups is their incredible versatility. Once you’ve got the classic layering technique down, it’s time to get creative. Whether you’re adding fruity flair or swapping in decadent chocolate, these variations can match any taste, dietary need, or occasion.
Chocolate Tiramisu Cups and Other Flavored Twists
Want to double down on decadence? Chocolate lovers can enhance the traditional recipe with a few simple upgrades:
- Chocolate Mascarpone Cream: Mix 2 tablespoons of melted dark chocolate into your mascarpone filling.
- Add Chocolate Ganache Layers: Between your cream and ladyfingers, drizzle a thin layer of ganache.
- Use Chocolate Ladyfingers: Swap standard Savoiardi with cocoa-infused ones for a bold bite.
Other bold-flavor twists include:
- Mocha Tiramisu Cups: Add cocoa powder to your espresso soak and layer with mocha whipped cream.
- Hazelnut Tiramisu Cups: Blend Nutella into the mascarpone mixture for a rich, Ferrero Rocher-inspired twis.
| Flavor Add-In | Ingredient Used |
|---|---|
| Dark Chocolate | Melted chocolate or chips |
| Nutella | 2 tbsp folded into mascarpone |
| Mocha | Instant espresso + cocoa |
| Caramel | Swirled between layers or on top |
Don’t miss our full-sized decadent tiramisu cake recipe: Tiramisu Cake
Fruit-Based Variations: Strawberry, Raspberry, Blueberry
Fruit brings a refreshing twist to the creamy richness of tiramisu cups. These options are perfect for spring and summer:
- Strawberry Tiramisu Cups: Use sliced strawberries between layers; substitute strawberry liqueur for coffee.
- Raspberry Tiramisu: Add raspberry jam or fresh berries between layers.
- Blueberry Lemon Tiramisu: Swap espresso for lemon juice and layer with lemon mascarpone and blueberries.
| Fruit Combo | Suggested Modifications |
|---|---|
| Strawberry & Cream | Strawberry purée + vanilla cream |
| Lemon & Blueberry | Lemon zest in cream, blueberry compote |
| Raspberry Cocoa | Fresh raspberries + cocoa powder |
Kid-Friendly and Alcohol-Free Tiramisu Cup Options
Making dessert for little ones or guests avoiding alcohol? No problem:
- Skip the Liqueur: Use decaf coffee or flavored syrups like vanilla, caramel, or hazelnut.
- Go Chocolate-Milk Style: Dip ladyfingers in chocolate milk for a dessert kids love.
- Layer with Fruit Yogurt: A lighter option using Greek yogurt or cream cheese.
| Kid-Friendly Swap | Replaces |
|---|---|
| Chocolate milk | Espresso |
| Yogurt cream | Mascarpone cream |
| Cookie crumbs | Ladyfingers |
These alternatives keep the fun of tiramisu while making it safe and enjoyable for every age group.
Check out this twist with tiramisu sponge base: Tiramisu Sponge Cake
Make-Ahead Tips and Storage for Tiramisu Cups
One of the most appealing aspects of tiramisu cups is how well they work as a make-ahead dessert. Whether you’re prepping for a party or simply planning a weeknight indulgence, tiramisu cups store beautifully and even improve in flavor with time.
Can I Make Tiramisu Cups Ahead of Time? (Yes—Here’s How)
Yes, in fact, you should! Tiramisu cups are best made 1 to 2 days in advance, allowing the coffee and cream to fully infuse the ladyfingers and create that dreamy texture everyone loves.
Here’s how to do it right:
- Assemble your cups fully, but hold off on cocoa powder until just before serving.
- Cover each cup tightly with plastic wrap or an airtight lid.
- Refrigerate for at least 6 hours, but ideally overnight or up to 48 hours.
| Prep Time | Storage Time | Best Flavor |
|---|---|---|
| 15–20 mins | 1–2 days | Day 2 (flavors deepen) |
Discover great ideas like these creamy tiramisu cookies: Tiramisu Cookies
How to Store in Fridge vs Freezer Without Compromising Texture
Fridge Storage:
- Store for up to 3 days in the refrigerator.
- Use tightly sealed jars or wrap with cling film to prevent fridge odors and moisture loss.
- Do not top with cocoa until just before serving to avoid clumps.
Freezer Storage:
- Tiramisu cups can be stored in the freezer for up to one month without compromising texture or flavor.
- Freeze in individual airtight containers.
- Thaw overnight in the fridge.
- Texture may change slightly, but the flavor holds up well.
| Storage Method | Duration | Tips |
|---|---|---|
| Refrigerator | 2–3 days | Add garnish before serving |
| Freezer | Up to 1 month | Thaw slowly in fridge |
💡 Note: Freezing may alter the creamy consistency slightly, but still yields a delicious treat.
How Long Should Tiramisu Sit Before Serving?
For the perfect bite, your tiramisu cups should sit for at least 6–8 hours in the fridge before serving. This allows:
- The espresso to fully soak the ladyfingers
- The cream to firm up for scoopable layers
- The flavors to develop and intensify
Overnight chilling (12–24 hours) is ideal, making this dessert a stress-free prep-ahead option for hosts.
Learn more about indulgent chocolate trifles for dessert cups: Chocolate Cheesecake Trifle
Ready to troubleshoot the most common tiramisu mistakes? Let’s dive into those fixes next.
Common Problems and Fixes When Making Tiramisu Cups
Even though tiramisu cups are fairly simple to assemble, a few missteps can turn this creamy dream into a culinary nightmare. But don’t worry—we’re breaking down exactly why your tiramisu may not set, taste right, or layer correctly, and how to fix it fast.
Why Won’t My Tiramisu Set? Fixes for Watery Layers
One of the most frustrating issues is a runny or watery tiramisu. Here’s what might be going wrong:
1. Underwhipped Cream:
Your mascarpone mixture should be thick and airy. If your whipped cream is too soft or not whipped at all, the cream won’t hold structure.
Fix: Whip your heavy cream to soft peaks before folding into the mascarpone.
2. Over-soaked Ladyfingers:
If your ladyfingers sit in espresso too long, they turn mushy and leak water into the cream.
Fix: Do a quick dip—no more than 1 second on each side.
3. Didn’t Chill Long Enough:
Tiramisu cups need time to set.
Solution: Refrigerate for a minimum of 6 hours, or even better, let it set overnight for optimal texture and flavor
| Problem | Likely Cause | Fix |
|---|---|---|
| Runny Cream | Underwhipped | Whip to soft peaks |
| Watery Bottom | Oversoaked | Quick dip in espresso |
| Doesn’t Hold Layers | Not enough chilling | Refrigerate overnight |
Tips for Layering Without Soggy Ladyfingers
Creating neat, distinct layers is part of tiramisu’s charm. But soggy or collapsed layers ruin that visual.
Here’s how to keep those layers perfect:
- Use a piping bag to apply cream neatly.
- Let ladyfingers cool after espresso dip before placing them in the cup.
- Press layers gently to avoid smashing air out of the cream.
Bonus Tip: Use tall narrow glasses instead of shallow ramekins—they hold their shape better.
What Causes a Bitter or Off Taste in Tiramisu Cups?
Tiramisu is all about balance. If yours tastes off, one of these issues may be to blame:
1. Overbrewed Coffee or Burnt Espresso
Overly strong espresso can make your tiramisu bitter.
Fix: Brew medium-strength espresso and taste before using.
2. Too Much Cocoa Powder
A heavy hand with bitter cocoa ruins the balance.
Fix: Lightly dust the top just before serving—less is more.
3. Stale or Low-Quality Ingredients
Old mascarpone or cheap ladyfingers can throw off the flavor.
Fix: Use fresh, high-quality ingredients—especially for mascarpone and cocoa.
Check out this twist with tiramisu sponge base: Tiramisu Sponge Cake
With these tips, your tiramisu cups will turn out rich, creamy, and visually stunning—every time. Up next? Let’s make them look even better.
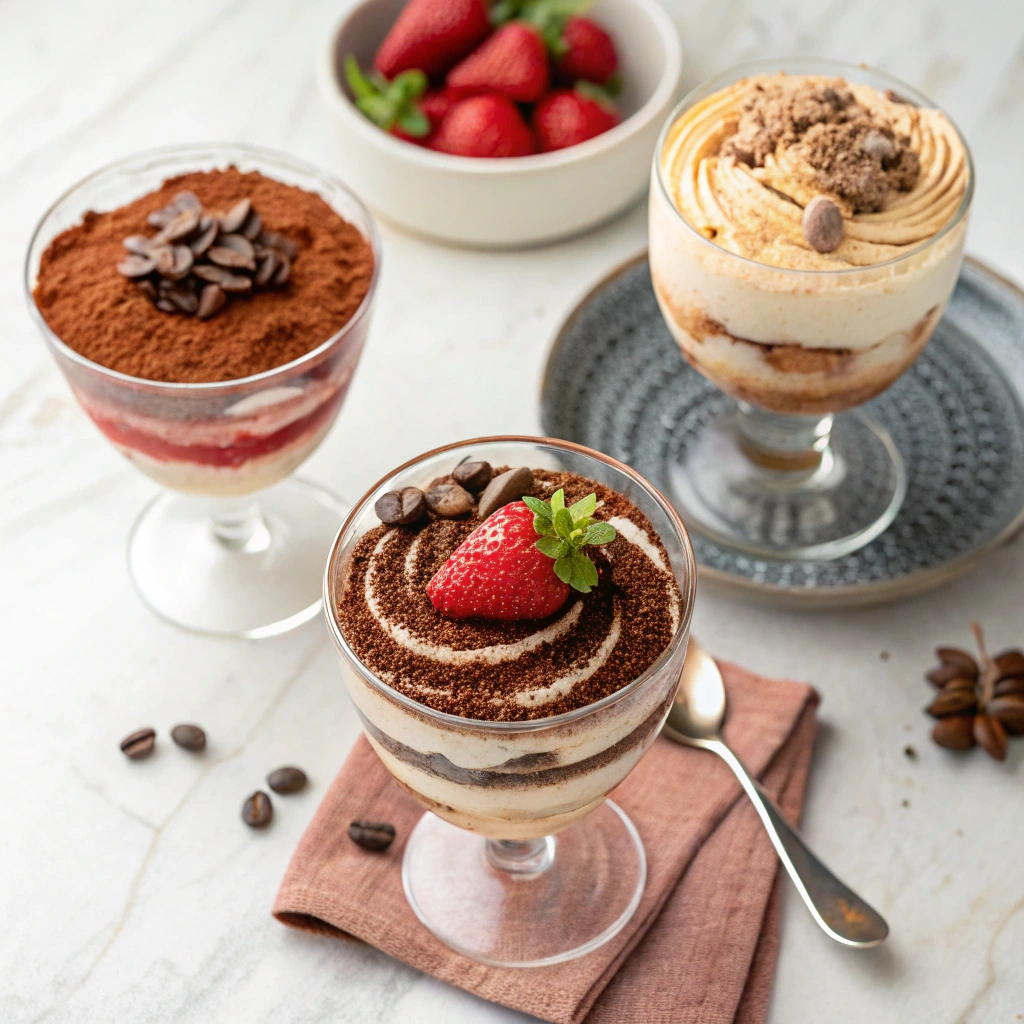
Serving and Presentation Ideas for Tiramisu Cups
While taste is king, presentation is queen—especially with a layered dessert like tiramisu. The beauty of tiramisu cups lies in their visual appeal: delicate layers of espresso-soaked cookies and fluffy cream shown through clear glass. With the right tools and garnishes, you can easily make this dessert look restaurant-worthy.
Why Is Tiramisu Served in Glass? (Presentation & Practicality)
Serving tiramisu in glass cups is more than just pretty—it’s smart. Here’s why:
- Visual Appeal: You can see every creamy, coffee-kissed layer. That’s food porn at its finest.
- Portion Control: Each guest gets an individual serving with no mess.
- Storage Convenience: Glass containers seal better and keep dessert fresher.
- Layer Integrity: Glass cups hold structure better than ramekins or plastic.
| Benefit | Why It Matters |
|---|---|
| Transparency | Enhances visual experience |
| Convenience | Easier to refrigerate & transport |
| Portion Size | Consistent servings every time |
Don’t miss our full-sized decadent tiramisu cake recipe: Tiramisu Cake
Best Glassware and Dessert Jars to Use
Want to elevate your tiramisu cups? Choose glassware that adds flair without overpowering the dessert. Here are top picks:
| Type | Description |
|---|---|
| Stemless Wine Glasses | Sleek and modern presentation |
| Mini Mason Jars | Great for rustic charm and gifting |
| Shot Glasses | Ideal for dessert bars or tasting events |
| Double-Walled Cups | Keeps dessert cold longer and adds drama |
💡 Pro Tip: Avoid wide or shallow containers. Taller glasses showcase layers better and prevent cream from sliding.
Discover great ideas like this tres leches cake variation: Tres Leches Cake
Garnishing and Final Touches: Cocoa Dust, Chocolate Shavings, Coffee Beans
The final layer of tiramisu should be just as indulgent as the rest. Here’s how to top it off for maximum appeal:
- Traditional Touch: Lightly dust the top with unsweetened cocoa powder using a fine mesh sieve for an elegant finish.
- Modern Touch: Add chocolate curls, espresso beans, or gold flakes.
- Holiday Theme: Use powdered sugar stencils, mini peppermint sticks, or crushed nuts.
| Garnish | Flavor Profile | Visual Impact |
|---|---|---|
| Cocoa Powder | Bitter | Matte finish |
| Dark Chocolate Shavings | Rich | Glossy contrast |
| Espresso Beans | Bold | Elegant accent |
| Crushed Pistachios | Nutty | Colorful crunch |
Make your tiramisu cups not just a dessert, but a moment—something worth photographing before the first bite.
Next, let’s explore how to make your tiramisu cups healthier or vegan-friendly, without sacrificing that rich Italian flavor.
Healthier and Vegan Options for Tiramisu Cups
While tiramisu is traditionally indulgent, it’s easy to adapt the recipe for modern dietary needs. Whether you’re vegan, cutting back on sugar, or avoiding gluten, there’s a tiramisu cup for you. These swaps don’t just work—they taste amazing.
How to Make Vegan Tiramisu Cups
Ditch the dairy and eggs, not the flavor. With a few simple substitutes, you can enjoy plant-based tiramisu that’s just as creamy and satisfying.
Vegan Swaps:
- Mascarpone Swap: For a dairy-free version, blend soaked cashews with coconut cream and a splash of lemon juice to mimic the tang and creaminess of traditional mascarpone
- Heavy Cream Substitute: Use full-fat coconut cream or aquafaba (whipped chickpea brine).
- Ladyfingers: Use store-bought vegan sponge cake or bake your own using almond flour.
- Coffee Layer: Keep the espresso but skip liqueur unless using vegan-certified brands.
Assembly Tip: The layering process is the same, just swap in the vegan alternatives and let it chill overnight.
| Traditional | Vegan Alternative |
|---|---|
| Mascarpone | Cashew cream blend |
| Heavy Cream | Coconut cream |
| Ladyfingers | Vegan sponge or GF cookies |
| Eggs | Omit or use whipped aquafaba |
Low-Sugar and Keto Variations of Tiramisu Cups
Watching your sugar intake? No problem—try these keto and low-carb tiramisu cup options:
- Sweetener: Use monk fruit, erythritol, or stevia instead of sugar.
- Cream: Stick with mascarpone and heavy cream—they’re naturally low in carbs.
- Base: Replace ladyfingers with keto almond sponge cake or low-carb cookies.
- Coffee Layer: Make it with unsweetened cold brew or decaf espresso.
| Standard Recipe | Keto Version |
|---|---|
| Sugar | Monk fruit or erythritol |
| Ladyfingers | Almond flour cake |
| Cocoa powder | Unsweetened 100% dark |
| Liqueur | Optional or skip |
💡 Tip: Add a few drops of vanilla and cinnamon to mimic the sweet warmth of traditional tiramisu.
Looking for inspiration? Try mini chocolate cakes too: Mini Chocolate Cakes
Calorie Count Comparison Table: Classic vs Vegan vs Low-Sugar
Here’s a brief overview comparing the nutritional profiles of the different versions:
| Type | Calories (1 cup) | Sugar | Fat | Carbs |
|---|---|---|---|---|
| Classic | ~400 | 25g | 28g | 30g |
| Vegan | ~350 | 18g | 25g | 32g |
| Low-Sugar/Keto | ~290 | 4g | 27g | 9g |
The vegan and low-sugar versions are lighter without compromising on taste, making them ideal for conscious eaters.
Check out this twist with tiramisu sponge base: Tiramisu Sponge Cake
Tiramisu Cups for Every Occasion
Tiramisu cups are not just a dessert—they’re a vibe. Whether you’re celebrating a special day or hosting a casual brunch, these elegant individual treats bring flavor and flair to every table. Here’s how to tailor them for different occasions.
Romantic Dinners, Birthdays, Holiday Feasts
Tiramisu cups feel upscale yet are incredibly approachable—making them a favorite for intimate dinners or festive get-togethers.
For Date Nights or Valentine’s Day:
- Serve in champagne glasses or coupe bowls.
- Add a romantic touch by topping with a chocolate heart or using a heart-shaped stencil to dust cocoa over the surface.
- Add a splash of Baileys or amaretto for a boozy twist.
For Birthdays and Celebrations:
- Top with birthday candles or edible glitter.
- Customize the flavor (e.g., strawberry tiramisu for a summer birthday).
- Use colorful sprinkles or layered fruit for a party vibe.
For Holidays:
- Add crushed candy canes for Christmas.
- Pipe green-dyed mascarpone for St. Patrick’s Day.
- Create patriotic layers using blueberries and strawberries for the 4th of July.
| Occasion | Custom Touch |
|---|---|
| Romantic Dinner | Heart-shaped cocoa stencil |
| Birthday | Candles + chocolate curls |
| Holiday Party | Festive toppers (peppermint, colored cocoa) |
Don’t miss our full-sized decadent tiramisu cake recipe: Tiramisu Cake
How to Package Tiramisu Cups for Gifting
Tiramisu cups make incredible homemade gifts. Whether you’re thanking a friend or showing love during the holidays, these travel-friendly treats are easy to share.
Packaging Tips:
- Use mini mason jars with screw lids.
- Tie a ribbon around each jar and add a handwritten tag for a charming, personalized presentation.
- Add a mini wooden spoon or tie-on coffee bean sachet for flair.
💡 Tip: Keep refrigerated until gifting, and label with “Keep chilled, enjoy within 3 days.”
| Container Type | Perk |
|---|---|
| Mason Jar | Airtight + giftable |
| Recyclable Dessert Cups | Great for events |
| Lidded Ramekins | Elegant and reusable |
Hosting a Party? Set Up a DIY Tiramisu Cup Bar
Turn your dessert into an experience with a DIY tiramisu cup bar—fun for birthdays, brunches, weddings, and beyond.
How to Set It Up:
- Provide small cups or jars, pre-cut ladyfingers, and bowls of cream.
- Offer multiple flavor options: classic, fruit-infused, chocolate, and boozy.
- Add toppings: cocoa powder, berries, mini chocolate chips, crushed cookies.
| Topping Ideas | Flavor Bonus |
|---|---|
| Crushed Oreos | Crunch & cocoa |
| Raspberries | Tart freshness |
| Cinnamon | Warm spice |
| Toasted coconut | Tropical twist |
It’s interactive, stylish, and makes every guest feel like a pastry chef.
Discover great ideas like these creamy tiramisu cookies: Tiramisu Cookies
Conclusion
Tiramisu cups are everything a dessert should be: rich, beautiful, easy to make, and endlessly customizable. Whether you’re going for classic Italian, vegan-friendly, or something totally outside the box, these single-serve treats check every box.
They’re perfect for making ahead, storing, gifting, and showing off at events. With the tips and variations covered in this guide, you’re now ready to whip up tiramisu cups that impress with every spoonful.
Check out this twist with tiramisu sponge base: Tiramisu Sponge Cake
Fore more recipes follow me in Facebook, medium and Pinterest
FAQs
Can I make tiramisu cups ahead of time?
Yes! Tiramisu cups are ideal make-ahead desserts. In fact, they taste even better when prepared 24–48 hours in advance. This resting time allows the espresso and mascarpone layers to fully meld and set for the best texture and flavor.
Why won’t my tiramisu set?
If your tiramisu cups are too soft or runny, the likely culprits are over-soaked ladyfingers, under-whipped cream, or not enough chilling time. Use a light dip in coffee, whip your cream to soft peaks, and chill for at least 6 hours—overnight is even better.
How long should tiramisu sit?
Serving tiramisu in clear glass cups enhances presentation by showing off its distinct, elegant layers. It also ensures even portions, preserves structure, and makes storage simpler—especially for parties or gifting.