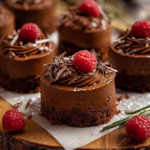
Dubai Chocolate Recipe is more than a dessert—it’s a bite of global luxury. I’m Mary, a culinary creator from Florida, inspired by my Afro-Latina roots and a lifelong love for comforting, homey meals. During my travels, Dubai’s rich, aromatic chocolates stood out like no other—infused with saffron, rose, cardamom, and even gold.
This recipe brings that bold flavor to your kitchen in under 30 minutes. At thelifecake.com, we make simple, delicious recipes easy for anyone to follow. Let’s turn something extraordinary into something anyone can enjoy at home.
Table of Contents
What Is Dubai Chocolate and Why Is It Trending?
What Makes Dubai Chocolate Unique?
If you’re curious about the dessert that’s taken over TikTok and Instagram, the Dubai Chocolate Recipe is your golden ticket to understanding what all the hype is about. This viral sensation isn’t just another chocolate bar—it’s an elevated, handcrafted treat made with bold Middle Eastern flavors.
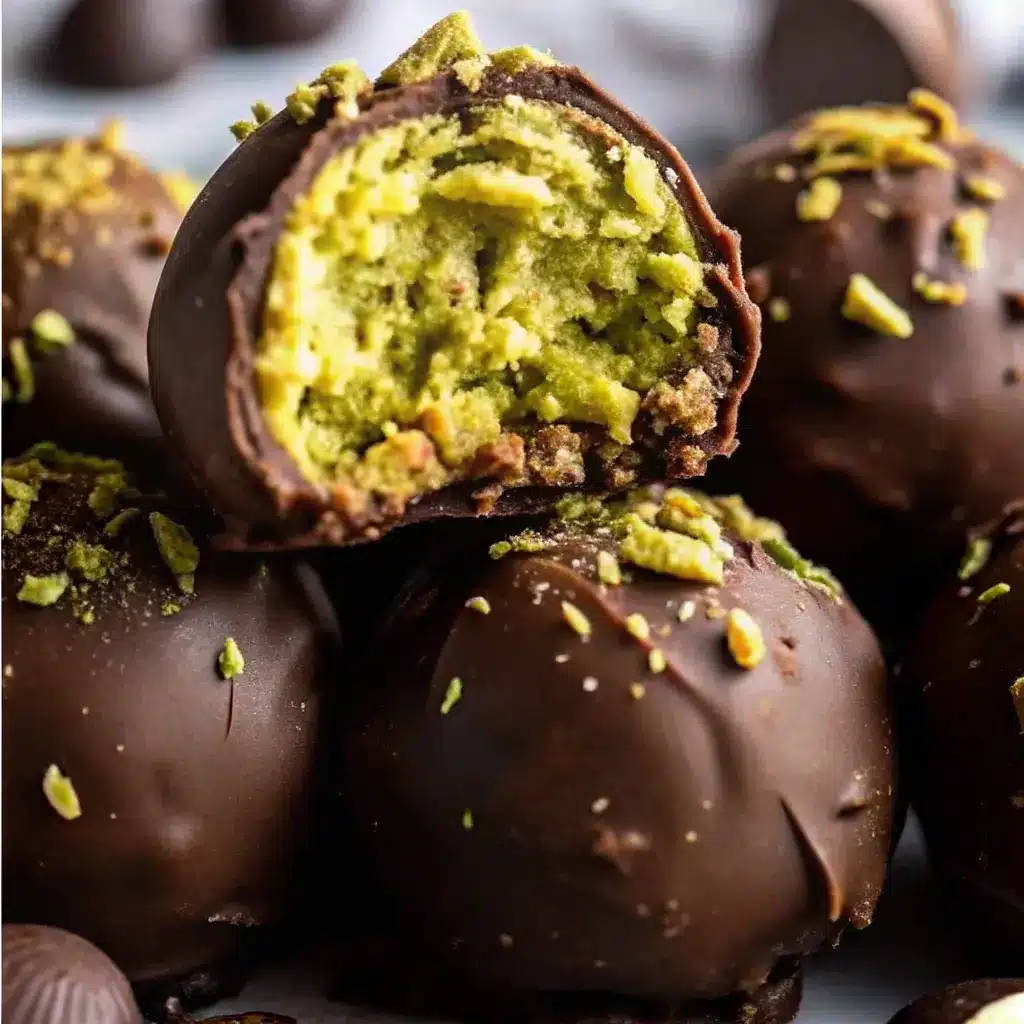
Central to this Dubai-inspired chocolate creation is a luxurious blend of crisp shredded kataifi dough, a velvety pistachio filling, and smooth, high-quality melted chocolate. The star ingredient, pistachio cream, brings a nutty sweetness that perfectly complements the slightly bitter edge of dark chocolate. Incorporate a hint of tahini for added richness, and you’ll unlock a flavor profile that’s truly unforgettable.
Unlike mass-produced candy bars, every piece of homemade Dubai chocolate is unique—especially when you follow a true Dubai Chocolate Recipe using authentic ingredients and professional techniques.
The Viral Craze: Why Dubai Chocolate Went Global
There’s no denying it—Dubai chocolate went viral for a reason. Whether it was the silky pistachio center oozing from a glossy chocolate shell or the satisfying crunch of toasted kataifi, this dessert immediately caught the internet’s attention. The original Dubai Chocolate Recipe was shared in glimpses online, but most versions missed the mark—either using the wrong pistachio filling or skipping critical steps in layering and molding.
Print
Dubai Chocolate Recipe
- Total Time: 15 minutes (plus chilling time)
- Yield: 4 servings 1x
Description
A luxurious chocolate dessert infused with exotic Middle Eastern flavors—think rich cocoa, hints of cardamom, and a touch of rose water.
Ingredients
- 200g dark chocolate (70% cocoa), chopped
- 1/2 cup heavy cream
- 1 tablespoon unsalted butter
- 1/4 teaspoon ground cardamom
- 1/2 teaspoon rose water
- Pinch of sea salt
- Chopped pistachios or edible gold flakes for garnish
Instructions
- In a saucepan, heat the cream over medium heat until just simmering.
- Remove from heat and stir in the chopped dark chocolate until melted and smooth.
- Add butter, cardamom, rose water, and a pinch of sea salt. Stir until fully combined.
- Pour into small serving cups or ramekins.
- Chill in the refrigerator for 1–2 hours until set.
- Before serving, garnish with chopped pistachios or edible gold flakes.
Notes
Serve in small portions—this dessert is rich! For a firmer set, increase the chocolate slightly or reduce the cream.
- Prep Time: 10 minutes
- Cook Time: 5 minutes
- Category: Dessert
- Method: Chilling
- Cuisine: Middle Eastern
Nutrition
- Serving Size: 1 small cup
- Calories: 310
- Sugar: 15g
- Sodium: 40mg
- Fat: 24g
- Saturated Fat: 14g
- Unsaturated Fat: 8g
- Trans Fat: 0g
- Carbohydrates: 22g
- Fiber: 3g
- Protein: 3g
- Cholesterol: 35mg
As the trend gained steam, so did the demand for an authentic recipe that gets it right. The combination of exotic ingredients, gourmet appeal, and social media beauty made the Dubai Chocolate Recipe the dessert world’s new obsession.
Today, many are skipping the overpriced store-bought versions and turning to homemade options. The good news? When you follow a tested and perfected Dubai Chocolate Recipe, you’ll realize that gourmet doesn’t have to mean complicated—or expensive.
Ingredients Breakdown for the Perfect Dubai Chocolate Bar
Essential Ingredients and Where to Find Them
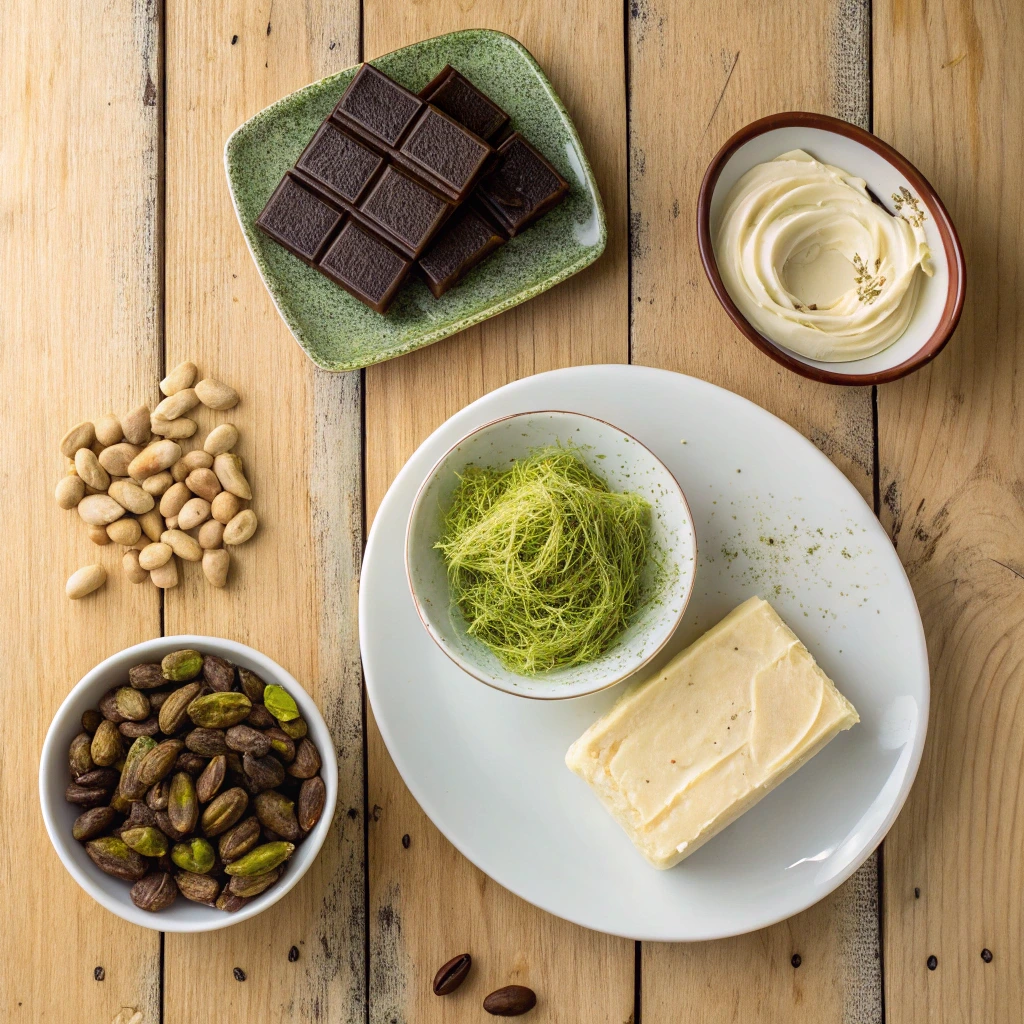
Crafting the perfect Dubai Chocolate Recipe starts with sourcing the right ingredients. Every element contributes essential character, coming together to create the distinctive taste and texture of this trending delight. While some ingredients are specialty items, most can be found online or at international grocery stores.
Here’s what you need:
| Ingredient | Description | Where to Find |
|---|---|---|
| Kataifi Dough | Also called shredded phyllo, provides the crispy texture in the filling. | Middle Eastern or Mediterranean stores |
| Pistachio Cream | NOT pistachio butter. It’s sweet, smooth, and made for desserts. | Online gourmet shops or specialty food stores |
| Tahini | Adds a rich, sesame flavor that balances the sweetness. | Most grocery stores, international aisle |
| Dark Chocolate | For a rich contrast to the sweet pistachio filling. | Grocery stores or chocolatiers |
| Unsalted Butter | Used to toast the kataifi to golden perfection. | Any grocery store |
| Salt | Just a pinch enhances the nutty profile of pistachios. | Pantry staple |
The Dubai Chocolate Recipe relies on premium versions of these ingredients. Cheap chocolate chips or the wrong kind of pistachio paste can ruin the balance. Look for high-quality dark chocolate bars with at least 60% cocoa, and always read the label on pistachio cream—it should be sweetened and smooth, not thick and savory.
Why Pistachio Cream, Kataifi, and Tahini Matter
The unique texture and taste of the Dubai Chocolate Recipe come from the combination of shredded kataifi and sweetened pistachio cream. Kataifi, when toasted in butter, becomes light and crispy—almost like delicate cereal. This adds the satisfying crunch you feel when biting into the bar.
Meanwhile, pistachio cream serves as the smooth, sweet filling that defines the center of the Dubai Chocolate experience. It’s rich without being overpowering and beautifully complements the bitter notes of dark chocolate.
Tahini might seem like an odd addition in a chocolate bar, but it’s this sesame paste that rounds out the flavor. It introduces a nutty complexity that softens the sugar rush and gives the chocolate bar an unmistakable Middle Eastern flair.
When balanced correctly, these three ingredients—pistachio cream, kataifi, and tahini—create the trademark taste and texture that sets a true Dubai Chocolate Recipe apart from copycats.
Dubai Chocolate Recipe Step-by-Step
Preparing the Kataifi Pistachio Filling
The heart of any good Dubai Chocolate Recipe is the kataifi pistachio filling. This isn’t just a filler—it’s what gives the bar its signature crunch and decadent interior. Follow these detailed steps to get it right every time:
- Toast the Kataifi:
Begin by gently pulling apart your kataifi strands. If they aren’t pre-chopped, use kitchen scissors to cut them into small pieces. In a large, deep frying pan, melt unsalted butter over medium heat, then add the kataifi. Stir continuously until golden brown and crisp. This step is crucial—undercooked kataifi will turn soggy, and overcooked ones will taste burnt. - Add Flavor:
Once the kataifi is toasted, remove it from heat and let it cool slightly. Stir in a pinch of salt, followed by a generous amount of sweet pistachio cream. Mix until the strands are evenly coated, forming a rich, cohesive mixture. - Blend in Tahini:
Add a small spoonful of tahini for depth. This will mellow the sweetness and give the mixture that complex Middle Eastern edge that defines an authentic Dubai Chocolate Recipe.
Melting and Tempering the Chocolate Correctly
The outer shell of your Dubai Chocolate bar is just as important as the filling. Here’s how to create a perfectly smooth, glossy chocolate coating that snaps when you bite it:
- Choose the Right Chocolate:
Avoid chocolate chips or baking bars with waxy additives. Use high-quality dark or milk chocolate—depending on your taste. - Melt the Chocolate:
Melt the chocolate using a double boiler by placing chopped pieces in a heat-safe bowl over gently simmering water, stirring continuously until silky smooth. Alternatively, for a faster option, microwave in 30-second intervals, stirring well after each burst. - Optional Tempering for Gloss:
If you want that professional look and satisfying snap, temper your chocolate. Use a thermometer and cool the melted chocolate to around 88–90°F before using it. - Coat Your Molds:
Spoon a layer of melted chocolate into your silicone molds, making sure to cover the base and sides evenly. Chill the molds in the refrigerator for a few minutes to let the initial chocolate layer firm up before adding the filling. - Add Filling and Seal:
FSpoon the kataifi-pistachio mixture into the molds, then pour a layer of melted chocolate over the top. Tap the molds lightly on the counter to eliminate air bubbles, and use a bench scraper to level the surface.

Once done, chill the molds until fully set. Carefully pop out the bars—and just like that, your homemade Dubai Chocolate Recipe is ready to enjoy.
Building and Molding the Dubai Chocolate Bar
Layering the Ingredients for Optimal Flavor
Now that your filling and chocolate are prepped, it’s time to assemble your Dubai Chocolate Recipe like a pro. The layering is where art meets science—every bite should give you crisp kataifi, creamy pistachio, and smooth chocolate in harmony.
- Start with the Chocolate Base:
Pour a spoonful of your tempered or melted chocolate into each mold cavity. Use a pastry brush or small spoon to spread the chocolate up the sides. This ensures the bar will hold its shape and seal in the filling. - Let the First Layer Set:
Refrigerate the mold for 5–10 minutes, just until the chocolate firms up. This step gives you a solid base to hold the filling without it leaking or mixing with the bottom layer. - Scoop in the Filling:
Take your pistachio-kataifi mixture and spoon it into the chocolate-lined molds. Gently press it down using the back of a spoon or clean fingers. Make sure to leave a little space at the top for the final chocolate seal. - Seal with More Chocolate:
Seal the filling with a final pour of melted chocolate. Gently tap the mold to release any trapped air, then smooth the surface with a bench scraper or spatula edge.
Using Molds: Tips for Perfect Results
Choosing the right mold is key in perfecting your Dubai Chocolate Recipe. The right mold gives structure, appearance, and functionality—making your bars easier to pop out and more beautiful to present.
- Go for Silicone:
Silicone molds are highly recommended because of their flexibility. They make it easy to release the bars without cracking the chocolate. - Deep Cavities Work Best:
Since the pistachio filling is thick and rich, you want molds that are deep enough to hold the layers without overflowing. A 1.5–2 cm cavity works great. - Clean Edges with a Bench Scraper:
This often-overlooked step gives your chocolate bar a professional look. Before placing in the fridge, glide a scraper across the mold to remove any excess chocolate and create a smooth, even backing. - Let It Set Fully:
Chill the chocolate bars for at least 30 minutes or until completely set before unmolding. Don’t rush this step—the better the set, the cleaner the results. - Add Finishing Touches (Optional):
Want to glam it up? Brush edible gold dust, sprinkle crushed pistachios, or drizzle extra chocolate over the top before unmolding. Presentation is everything!
Whether you’re gifting or indulging, these molding techniques will elevate your Dubai Chocolate Recipe into something that looks straight out of a luxury dessert box.
Variations and Creative Twists on the Dubai Chocolate Recipe
Fun Flavor Variations to Try at Home
One of the greatest strengths of the Dubai Chocolate Recipe is its incredible versatility. While the original version features a pistachio-kataifi core wrapped in dark chocolate, you can get creative and make it your own.
Here are a few crowd-pleasing variations:
| Variation Name | Key Ingredients or Adjustments |
|---|---|
| White Chocolate & Raspberry | Swap dark chocolate for white, and add a dollop of raspberry jam to the filling. |
| Nutella Hazelnut Bar | Replace pistachio cream with Nutella and add toasted hazelnuts for crunch. |
| Cardamom Rose Pistachio Bar | Add a pinch of cardamom and rose water to the pistachio mixture for a floral twist. |
| Coconut Crunch Bar | Mix shredded coconut into the kataifi for added texture and a tropical vibe. |
| Biscoff Bar | Use Biscoff spread instead of pistachio cream, paired with white chocolate. |
Feel free to experiment by blending different flavors to suit the season or special events. For example, add crushed candy canes and peppermint essence for a festive holiday version. It’s easy to stay within the framework of a classic Dubai Chocolate Recipe while bringing your unique twist.
Playing with Molds and Shapes for Presentation
The mold you choose can dramatically impact not just the shape, but also the presentation of your chocolate bar. If you’re planning to serve these at a party, gift them, or even sell them, creative molding can go a long way.
Here are a few suggestions:
- Mini Bar Molds:
Use mini silicone molds to make single-serving Dubai Chocolate bites. These are perfect for holiday gift boxes or party favors. - Easter Egg Molds:
Fill half-egg molds with the kataifi filling and seal with chocolate to make a seasonal treat. - Geometric Silicone Molds:
Want something more modern and elegant? Try triangle, dome, or hexagon molds for an upscale look. - Lollipop Sticks:
Pour your Dubai Chocolate Recipe into popsicle-style molds with sticks for a dessert on a stick.
Equipment You’ll Need to Make Dubai Chocolate at Home
Must-Have Kitchen Tools for Success
While the Dubai Chocolate Recipe uses only a handful of ingredients, having the right tools on hand can make all the difference between a homemade flop and a flawless, luxurious dessert bar. These are the items you don’t want to skip:
| Tool | Purpose |
|---|---|
| Silicone Chocolate Molds | Ensures easy release and professional-looking results. |
| Frying Pan | For toasting kataifi to golden perfection. |
| Heat-Proof Bowl | Essential for safely melting chocolate over a double boiler or microwave. |
| Spatula or Spoon | Helps with mixing and spreading the filling evenly. |
| Bench Scraper | Ideal for smoothing chocolate and cleaning mold edges. |
| Digital Thermometer | Necessary for tempering chocolate to get that glossy, crisp finish. |
A solid Dubai Chocolate Recipe deserves clean execution, and investing in the above equipment ensures your bars won’t stick, burn, or break apart. If you’re serious about dessert-making, these tools will serve you well beyond just this recipe.
How to Use Your Tools Like a Pro
Now that you’ve got the right equipment, here’s how to use them effectively to master your Dubai Chocolate Recipe:
- Silicone Molds:
Lightly wipe them with a clean paper towel before use—no greasing required. Pour chocolate carefully to avoid bubbles, and tap the mold to settle contents. - Heat-Proof Bowl:
If melting chocolate over a pot of simmering water, make sure the bowl doesn’t touch the water. This helps avoid overheating, which might make the chocolate seize up. - Frying Pan:
Use medium heat and keep stirring the kataifi with butter. Stop as soon as the strands become golden—carryover heat can continue cooking, so remove from pan quickly. - Bench Scraper:
Run it flat across the top of your mold after sealing with chocolate. This creates a smooth, professional finish for your bar’s back side. - Digital Thermometer:
If tempering, watch for that 88–90°F sweet spot when cooling dark chocolate. This helps the chocolate set with a glossy finish and that perfect “snap.”
Using these tools the right way elevates the homemade Dubai Chocolate Recipe into a gourmet-level dessert worthy of any fancy confectionery box or Instagram feed.
Storage, Gifting, and Shelf Life Tips
How to Store Dubai Chocolate the Right Way
After all the care that goes into crafting your Dubai Chocolate Recipe, it’s crucial to store it the right way. These luxurious pistachio-filled chocolate bars deserve more than just a spot in your fridge. In fact, refrigerating them can be a mistake.
Why? Because moisture ruins the texture. When you place your homemade Dubai Chocolate in the fridge, condensation forms and can dull the chocolate’s glossy finish or make the crispy kataifi go soft. Instead, store them in a cool, dry place—think pantry or cupboard, ideally below 70°F (21°C).
Wrap each bar in foil or wax paper and place it in an airtight container. This shields the chocolate from exposure to air, humidity, and overpowering smells, preserving the rich flavors of the pistachio cream and tahini filling as fresh and indulgent as when first prepared.
By properly storing your Dubai Chocolate bars, you can ensure they remain fresh, beautiful, and absolutely delicious every time you take a bite.
Long Shelf Life Means Perfect for Gifting
One of the best things about this Dubai Chocolate Recipe is that it’s not just tasty—it’s practical too. These bars have a long shelf life, making them perfect for gifting.
Homemade Dubai Chocolate can last up to 3 months when stored properly. That’s a game-changer, especially around holidays, birthdays, or festive seasons like Eid. Just wrap them in beautiful foil, place them in a custom box, and you’ve got a thoughtful, gourmet-level gift made right in your kitchen.
You could even customize your Dubai Chocolate bars with different decorations or use themed molds for special events. Add a little tag with ingredients or a message, and suddenly, you’ve elevated your dessert into a personalized luxury experience.
Plus, making your own batch using the Dubai Chocolate Recipe is far more economical than buying them online, where a single bar can cost up to $30.
Whether you’re sharing them with loved ones or saving them for indulgent moments, this dessert is built to last—and impress.
Conclusion
There’s no denying that the Dubai Chocolate Recipe lives up to its viral reputation. With its crisp, buttery kataifi, silky pistachio cream, and glossy chocolate shell, this treat strikes the perfect balance between indulgence and sophistication. It’s not just a dessert—it’s an experience that transports your taste buds straight to the luxurious sweet shops of the Middle East.
Even though the ingredients can be a bit of an investment, making your own Dubai chocolate at home offers more value, customization, and satisfaction than buying a single bar at a premium. Plus, it makes an unforgettable gift or a stunning dessert for any occasion.
From sourcing quality ingredients to storing your creations like a pro, you now have everything you need to recreate this luxurious treat in your kitchen. Don’t be surprised when friends start asking for your secret recipe!
Fore more recipes follow me in Facebook, medium and Pinterest
FAQs
What is the famous Dubai chocolate?
The famous Dubai Chocolate that has taken over social media is a luxurious chocolate bar filled with a creamy pistachio center and crispy kataifi pastry. It’s inspired by traditional Middle Eastern desserts and has become a viral trend due to its indulgent texture, rich flavor, and elegant presentation. The Dubai Chocolate Recipe is known for combining high-quality dark or milk chocolate with sweet pistachio cream and crunchy, buttery layers—making it a standout in the world of gourmet sweets.
Why is Dubai chocolate so expensive?
Great question! Dubai Chocolate is expensive primarily due to the premium ingredients involved. Pistachio cream, real chocolate (not compound or chips), kataifi dough, and tahini all come with a hefty price tag—especially when sourced in high quality. These bars are often hand-crafted, beautifully packaged, and imported, all of which add to the final price. However, using the Dubai Chocolate Recipe at home allows you to control the cost and still enjoy that same luxurious treat at a fraction of the price.
Why is Dubai chocolate so trendy?
The rise of Dubai Chocolate can be credited to viral videos showcasing its stunning cross-section, where pistachio cream oozes from inside a shiny chocolate shell. Add in the exotic Middle Eastern ingredients, luxury branding, and the visual appeal of gold-dusted bars, and you’ve got a perfect storm for internet fame. Beyond the looks, the flavor delivers—making the Dubai Chocolate Recipe a go-to for foodies, influencers, and home bakers looking to impress.