Vanilla mousse is the kind of dessert that makes you close your eyes with every bite. It’s rich but airy, sweet but not overwhelming, and perfectly smooth in texture. Whether you’re layering it in a cake, serving it in a fancy glass, or eating it straight from the bowl with a spoon, vanilla mousse delivers elegance with minimal effort.

Table of Contents
What is Vanilla Mousse? A Delicious Introduction
The Origins of Vanilla Mousse and Its Rise to Fame
Vanilla mousse may feel like a modern invention with its glossy, Instagram-worthy appearance, but mousse itself dates back to 18th-century France. The word “mousse” literally means “foam” in French — which perfectly describes the light, airy structure of this dessert.
While chocolate mousse dominated early French cuisine, vanilla mousse found its niche among bakers and pastry chefs looking for a blank yet flavorful canvas. Vanilla brought a subtle sweetness and luxurious aroma that could balance strong flavors or stand gracefully on its own.
Vanilla Mousse
- Total Time: 15 minutes plus chilling
- Yield: 6 servings 1x
Description
A rich yet airy dessert, vanilla mousse is sweet without being overwhelming, with a perfectly smooth texture ideal for serving alone, in cakes, or layered parfaits.
Ingredients
- 2 cups heavy whipping cream (chilled)
- 1/2 cup granulated sugar (adjust to taste)
- 1 tbsp pure vanilla extract or seeds from 1 vanilla bean
- 1 tsp unflavored gelatin (optional, for structure)
- 2 tbsp cold water (for blooming gelatin)
- (Optional) 2 egg yolks
- (Optional) 1/4 cup milk (to temper yolks)
Instructions
- (Optional) Bloom gelatin: In a small bowl, pour in the cold water and sprinkle gelatin evenly on top. Let bloom 5–10 minutes, then gently heat until dissolved. Cool slightly.
- Whip the cream: Beat chilled cream on medium-high speed until soft peaks form. Do not overwhip.
- Add sugar and vanilla: Gently beat in sugar and vanilla extract or seeds until combined.
- Fold in gelatin (if using): Slowly drizzle in cooled gelatin while folding gently with a spatula.
- Spoon or pipe into cups: Divide mousse into serving glasses or containers.
- Chill for at least 2 hours before serving, or overnight for best results.
Notes
For the best texture, use cold tools and cream, fold gently, and chill thoroughly before serving. Gelatin helps mousse hold shape for cakes or piping.
- Prep Time: 15 minutes
- Cook Time: 0 minutes
- Category: Dessert
- Method: No-Bake
- Cuisine: French
Nutrition
- Serving Size: 1 cup
- Calories: 320
- Sugar: 16g
- Sodium: 25mg
- Fat: 28g
- Saturated Fat: 18g
- Unsaturated Fat: 9g
- Trans Fat: 0g
- Carbohydrates: 17g
- Fiber: 0g
- Protein: 3g
- Cholesterol: 95mg
In modern kitchens, vanilla mousse is prized for its adaptability—whether enjoyed on its own, layered as a cake filling, or used to crown trifles and pies..
Key Characteristics: What Makes Vanilla Mousse Unique?
So, what sets vanilla mousse apart from other creamy desserts like pudding or custard?
Here’s a quick table breaking it down:
| Feature | Vanilla Mousse | Pudding | Custard |
|---|---|---|---|
| Texture | Light, airy, whipped | Thick, smooth | Rich, slightly firm |
| Key Ingredients | Whipping cream, vanilla, sugar | Milk, sugar, cornstarch | Egg yolks, milk, sugar |
| Preparation Method | Whipped and folded | Cooked and stirred | Cooked slowly over heat |
| Served Best | Chilled in cups or as a filling | Warm or cold | Warm or cold (sometimes baked) |
Vanilla mousse stands out because of its whipped texture, achieved by folding whipped cream into a vanilla-infused base. This technique creates air pockets, resulting in a dessert that’s cloud-like yet full of flavor.
Learn more about light mousse textures in our White Chocolate Mousse, which balances elegance and fluff beautifully.
Ingredients You Need to Make Vanilla Mousse
The Essential Ingredients: Cream, Sugar, Vanilla, and More
Vanilla mousse is a simple dessert at heart, but the key lies in the quality of the ingredients. Using fresh, high-grade elements can take your mousse from basic to bakery-worthy.
Here’s a breakdown of what you need:
| Ingredient | Role in Mousse | Tips for Best Results |
|---|---|---|
| Heavy Whipping Cream | Forms the airy base | Use chilled cream with at least 36% fat |
| Granulated Sugar | Adds sweetness | Adjust to taste or swap for powdered sugar |
| Vanilla Extract | Infuses flavor | Opt for pure vanilla extract, not imitation |
| Gelatin (optional) | Stabilizes the mousse for layering | Bloom properly before use |
| Egg Yolks (optional) | Adds richness and smoothness | For a more custard-like flavor |
| Milk (optional) | Lightens the base if using yolks | Whole milk is best for richness |
If you’re going for a no-bake, eggless version, you’ll only need cream, sugar, vanilla, and optional gelatin. This makes the mousse perfect for summer gatherings or when you want to avoid complex cooking steps.
Pro Tip: For a firmer texture (like when using mousse as a cake filling), gelatin or agar-agar can help keep everything stable without compromising taste.
Choosing Between Vanilla Extract, Paste, or Real Vanilla Bean
When it comes to flavor, not all vanilla is created equal. Your choice of vanilla source makes a huge difference in the final aroma and taste of your mousse.
Let’s compare your options:
| Type of Vanilla | Flavor Profile | Best Use Case |
|---|---|---|
| Pure Vanilla Extract | Mild, balanced vanilla taste | Everyday use; easy to mix into any base |
| Vanilla Bean Paste | Strong flavor with visible specks | Ideal for presentation & gourmet recipes |
| Whole Vanilla Bean | Boldest, most natural flavor | Use for luxury desserts and vanilla bean mousse |
What’s the difference between vanilla mousse and vanilla bean mousse?
Vanilla mousse typically uses extract, while vanilla bean mousse contains the scraped seeds from a real vanilla pod, giving it a stronger aroma and signature speckled look.
Check out how vanilla enhances layers in our Vanilla Cake with Raspberry Filling — a perfect example of how to balance cream and fruit.
Looking for inspiration? Try this base dessert Vanilla Cake Recipe that pairs beautifully with a vanilla mousse topping or filling.
How to Make Vanilla Mousse Step-by-Step (Easy Recipe)
Classic Vanilla Mousse Recipe with Simple Instructions
If you’ve never made mousse before, don’t worry — it’s surprisingly simple. With just a few ingredients and some gentle folding, you’ll have a creamy, airy vanilla mousse that tastes like it came straight from a French patisserie.
Here’s a basic, beginner-friendly recipe using 5 core ingredients (eggless version included):
Ingredients:
- 2 cups heavy whipping cream (chilled)
- 1/2 cup granulated sugar (adjust to taste)
- 1 tbsp pure vanilla extract or 1 vanilla bean
- 1 tsp unflavored gelatin (optional, for structure)
- 2 tbsp cold water (for blooming gelatin)
Optional Egg-Based Version:
- Add 2 egg yolks
- 1/4 cup milk (to temper yolks)
Step-by-Step Instructions:
- (Optional) Bloom Gelatin
In a small bowl, pour in the cold water and evenly sprinkle the gelatin over the top. Let it bloom for 5–10 minutes, then gently heat to dissolve (don’t boil). Set aside to cool slightly. - Whip the Cream
Using a hand mixer or stand mixer, beat the chilled cream on medium-high speed until soft peaks form. Don’t overwhip — you want it smooth, not grainy. - Add Sugar and Vanilla
Gently beat in the sugar and vanilla extract or seeds (if using a whole bean). If using paste, a teaspoon will do. Beat until combined. - Fold in Gelatin (If Using)
Slowly drizzle in the cooled gelatin while gently folding with a spatula. This step helps your mousse hold shape when layered or piped. - Spoon or Pipe Into Cups
Divide the mousse into glasses or containers. Refrigerate for at least 2 hours before serving to allow it to set properly. For best results, refrigerate overnight.
Want a gourmet twist? Try making it with vanilla bean paste or a whole vanilla pod instead of extract — you’ll notice a big difference in aroma and flavor depth.
Tips to Get the Perfect Texture Every Time
Even though this recipe is simple, a few mistakes can ruin the magic. Here’s how to get it just right:
| Tip | Why It Matters |
|---|---|
| Use cold tools and cream | Helps cream whip up faster and hold structure |
| Fold gently | Preserves the airy texture of the whipped cream |
| Don’t overbeat the cream | Prevents curdling or a buttery texture |
| Bloom gelatin properly | Avoids gritty bits and helps mousse set smoothly |
| Chill before serving | Develops flavor and sets the mousse perfectly |
Don’t miss our Vegan Chocolate Mousse Cake for a completely egg- and dairy-free twist on the classic mousse experience.
Vanilla Bean Mousse: Elevate the Flavor
What Is Vanilla Bean Mousse and How It Differs from Regular Mousse
Vanilla bean mousse is essentially a richer, more aromatic twist on classic vanilla mousse—featuring a deeper, more pronounced flavor from real vanilla beans and a speckled, visually appealing appearance from the seeds.. What sets it apart? The tiny black flecks of real vanilla seeds dispersed throughout the mousse. These specks not only signal gourmet quality but also deliver a deep, natural aroma that vanilla extract can’t match.
Key Differences at a Glance:
| Feature | Vanilla Mousse | Vanilla Bean Mousse |
|---|---|---|
| Vanilla Source | Usually extract or paste | Real vanilla bean pods (scraped seeds) |
| Flavor Intensity | Milder, smooth | Bolder, complex, aromatic |
| Visual Appeal | Smooth white or off-white | Visible black vanilla flecks throughout |
| Best For | Everyday desserts | High-end occasions, layered cakes, parfaits |
The use of vanilla bean makes this mousse perfect for special occasions, where flavor and aesthetics need to wow the crowd. It’s an ideal choice when you’re filling a wedding cake, plating a fine dessert, or simply impressing at a dinner party.
Using Real Vanilla Beans for Deep, Aromatic Flavor
If you’ve never used a real vanilla bean before, here’s how to do it right:
How to Prepare a Vanilla Bean:
- Slice it Lengthwise: Use a sharp knife to split the pod down the middle.
- Scrape the Seeds: Scrape the inside with the back of the knife to collect the seeds.
- Infuse Cream: Heat a small portion of your cream and steep both the seeds and pod for 10 minutes. Remove the pod before whipping.
This method gives your mousse a warm, floral, and almost caramel-like scent that artificial vanillas can’t replicate.
Substitution Guide:
| Vanilla Type | Amount to Use |
|---|---|
| 1 whole vanilla bean | Equals 1 tablespoon extract or paste |
| Vanilla bean paste | Use 1 tsp for visible flecks |
| Extract (pure) | Use 1 to 1.5 tsp |
If you’re layering this in a cake or parfait, using vanilla bean mousse adds a layer of gourmet elegance and deeper flavor that stands up well against fruit fillings, caramel sauces, or chocolate shavings.
Discover great ideas like our Chocolate Raspberry Cake where mousse flavor depth complements rich layers.
Vanilla Mousse for Cakes: Fillings That Wow
How to Make Vanilla Mousse Filling for Cake Layers
Vanilla mousse isn’t just for spooning into dessert glasses — it’s also a game-changer when used as a cake filling. Its creamy, light consistency pairs beautifully with sponge cakes, butter cakes, and even chocolate layers. But to use it in a structured dessert like a cake, you’ll need to make a few adjustments.
Here’s how to make a stabilized vanilla mousse filling that holds its shape between layers and doesn’t ooze out the sides.
Stabilized Vanilla Mousse Filling Recipe:
| Ingredient | Quantity |
|---|---|
| Heavy cream | 2 cups (chilled) |
| Powdered sugar | 1/2 cup |
| Pure vanilla extract | 1 tbsp or seeds from 1 bean |
| Unflavored gelatin | 2 tsp |
| Cold water | 3 tbsp |
Steps:
- Bloom gelatin in cold water for 5 minutes.
- Gently warm the gelatin in a saucepan or microwave until fully dissolved (do not boil).
- In a separate bowl, beat the cream until it forms soft peaks.
- Add powdered sugar and vanilla, continue beating just until incorporated.
- Slowly fold in the cooled gelatin, making sure not to deflate the cream.
- Use immediately to spread between cake layers, or pipe for added design.
This stabilized version holds its shape beautifully in the fridge, staying fresh and intact for 2–3 days without releasing liquid or collapsing.
Tips to Stabilize Mousse for Piping and Layering
Making mousse structurally sound is all about temperature control and technique. Whether you’re using it to fill a cake or as a frosting alternative, keep these tips in mind:
| Technique | Result |
|---|---|
| Use gelatin or agar-agar | Prevents the mousse from melting |
| Chill before spreading | Firms up the mousse for better control |
| Pipe with a round or star tip | Enhances presentation for tarts or cupcakes |
| Build cakes in a springform pan | Helps keep layers neat while mousse sets |
Best Cakes to Pair With Vanilla Mousse:
- Vanilla sponge cake (classic combo)
- Chocolate cake (rich + light contrast)
- Red velvet cake (adds a creamy finish)
- Strawberry shortcake (balances fruit and cream)
Check out how we use similar textures in our Vegan Chocolate Mousse Cake — perfect for layering and slicing cleanly.
Vanilla mousse filling can take your baked creations to the next level, transforming a simple cake into a high-end dessert experience.
Variations and Twists on the Classic Vanilla Mousse
White Chocolate Vanilla Mousse and Other Flavor Combos
Vanilla mousse is beautiful in its simplicity, but that’s also what makes it a perfect base for creative variations. Whether you want to add richness with white chocolate or brighten it with citrus zest, the possibilities are endless.
Let’s explore some of the most popular and flavor-packed twists:
1. White Chocolate Vanilla Mousse
A blend of melted white chocolate and vanilla-infused whipped cream results in a decadent yet light dessert with a buttery finish.
How to make it:
- Melt 4 oz white chocolate, let it cool.
- Fold into your whipped vanilla mousse base.
- Chill until set.
This is a crowd-pleaser for holiday desserts or layered parfaits.
2. Citrus Vanilla Mousse
Add 1 tsp lemon or orange zest to the base for a fresh, tangy note that pairs wonderfully with fruit layers or sponge cake.
3. Caramel Vanilla Mousse
Swirl in 2 tbsp salted caramel into the whipped mousse for a rich, indulgent twist. Add a finishing touch by sprinkling toffee pieces or drizzling caramel over the top for extra flavor and visual appeal.
4. Espresso Vanilla Mousse
Mix 1 tsp of espresso powder into the whipped cream for a cappuccino-like mousse that hits just the right notes of bitterness and sweetness.
5. Berry Compote Vanilla Mousse
Layer the mousse with raspberry, blueberry, or strawberry compote for visual appeal and flavor contrast.
Discover great ideas like our Chocolate Raspberry Cake that balances fruit and cream for an elevated mousse experience.
Low-Sugar and Dairy-Free Vanilla Mousse Options
Vanilla mousse can easily be adapted to fit dietary needs without losing its signature lightness or flavor.
Dairy-Free Version (Vegan)
Swap out traditional cream with full-fat coconut cream or whippable oat cream.
Ingredients:
- 1 can coconut cream (chilled overnight)
- 1/4 cup maple syrup or agave
- 1 tsp vanilla bean paste
- Pinch of salt
How to make it:
- Scoop the solid coconut cream from the top of the can.
- Whip until fluffy, add vanilla and sweetener.
- Chill before serving.
Low-Sugar Version
Replace sugar with stevia, erythritol, or monk fruit sweetener. Be careful not to overdo it, as these sweeteners are much more concentrated.
Looking for inspiration? Try this base dessert Vanilla Cake Recipe and swap in your favorite mousse variation for a healthier twist.
Serving and Presentation Ideas for Vanilla Mousse
Glass Cups, Parfaits, and Plated Desserts: How to Style It
Presentation can take your vanilla mousse from a simple treat to an elegant, restaurant-quality dessert. With its creamy, structured texture, mousse can be piped, scooped, layered, or molded to suit any occasion.
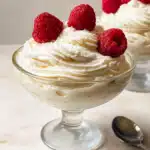
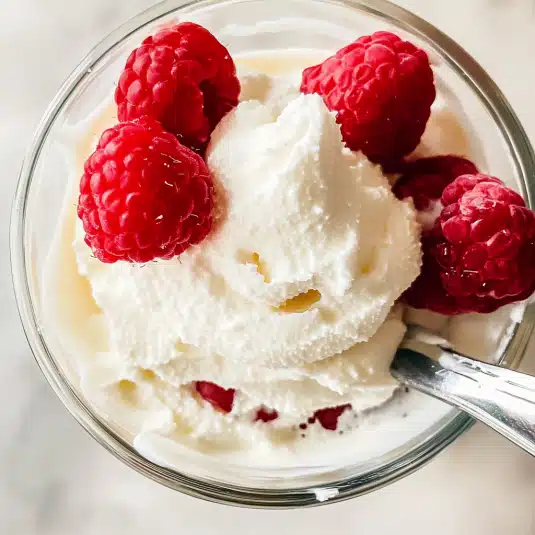
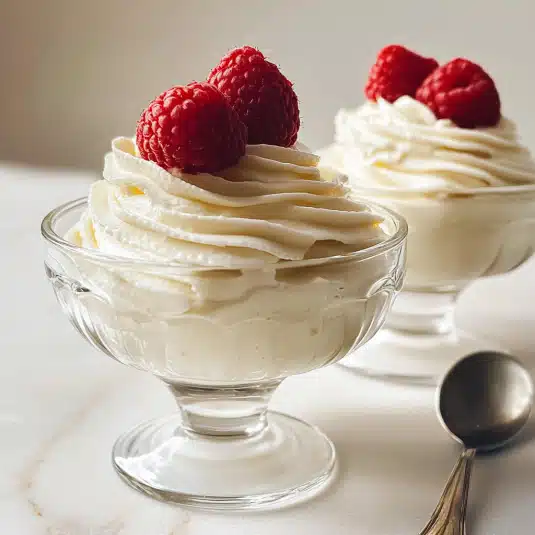
1. Individual Glasses or Jars
Serving vanilla mousse in small glasses is both practical and beautiful. You can see the layers, and it keeps portions consistent.
- Use wine glasses, shot glasses, or mini mason jars.
- Pipe the mousse for a clean, professional look.
- Alternate with layers of fruit, cookie crumbs, or jam.
2. Layered Parfaits
Vanilla mousse shines when layered with bold elements like:
| Layer Option | Flavor Boost |
|---|---|
| Crushed graham crackers | Crunch and texture contrast |
| Raspberry or strawberry compote | Adds tartness and color |
| Chocolate shavings | Richness and decadence |
| Lemon curd | Bright, citrusy balance |
Parfaits are perfect for dinner parties or brunch desserts. Layer them in tall glasses to create a striking vertical presentation.
3. Plated Desserts
If you’re feeling fancy, pipe mousse quenelles (oval shapes) onto dessert plates alongside sponge cake slices, macarons, or fresh fruit. Garnish with:
- A mint sprig
- Drizzled chocolate
- Caramel threads
- Edible flowers
Toppings: Fruits, Caramel, Nuts, and Chocolate Accents
Great toppings turn a soft mousse into a multi-textured masterpiece. Here’s a cheat sheet of crowd-favorite additions and what they pair best with:
| Topping | Best With | Flavor Notes |
|---|---|---|
| Fresh berries | Vanilla bean mousse | Adds tartness and color |
| Caramel sauce | White chocolate vanilla mousse | Sweet and rich contrast |
| Chopped hazelnuts | Espresso vanilla mousse | Nutty crunch |
| Dark chocolate curls | Classic vanilla mousse | Bitter-sweet balance |
| Crushed cookies (Oreos or vanilla wafers) | Parfait-style mousse | Crunchy contrast |
For formal events, don’t underestimate simple whipped cream and a dusting of cocoa powder — they elevate even the simplest mousse presentation.
Don’t miss our Tiramisu Cake for inspiration on mousse styling and layered cream effects.
Storing and Freezing Vanilla Mousse
How Long Does Vanilla Mousse Last in the Fridge?
Once made, vanilla mousse should be stored chilled to preserve its smooth texture and fresh flavor. Since mousse is dairy-based and contains whipped cream, refrigeration is essential.
Shelf Life (Refrigerated):
| Condition | Duration | Notes |
|---|---|---|
| Freshly made, covered | Up to 3 days | Best flavor and texture within 24–48 hours |
| Used in cake layers | 2–3 days | Store entire cake in fridge |
| With fruit toppings/compotes | 1–2 days | May become soggy or weep moisture |
Storage Tips:
- Use an airtight container or wrap mousse cups tightly with plastic wrap.
- Keep the mousse away from strong-smelling foods in the fridge (like onions or garlic) as it can absorb odors.
Tip: If you’re using mousse for a party or event, you can prepare it one day in advance for the best flavor and firmness.
Freezing Tips Without Compromising Texture
Can you freeze vanilla mousse? Yes — with a few considerations.
How to Freeze Vanilla Mousse:
- Portion the mousse into freezer-safe containers or cupcake molds.
- Cover tightly with plastic wrap or lids.
- Label with the date.
- Freeze for up to 1 month.
Thawing Process:
- Place in the fridge overnight.
- Do not microwave or thaw at room temperature — this will break down the whipped texture and cause separation.
| Freezing Type | Texture Result |
|---|---|
| Classic mousse (no gelatin) | May become slightly watery |
| Stabilized mousse (with gelatin) | Holds shape better post-thaw |
For best results, freeze mousse made with gelatin or white chocolate, as these help the structure survive the freezing process.
Don’t miss our White Chocolate Mousse — it freezes better than traditional versions due to its firmer base.
Vanilla Mousse Troubleshooting and Pro Tips
Common Mistakes to Avoid When Making Mousse
Even though vanilla mousse is a simple dessert, a few small errors can result in a grainy, runny, or overly dense texture. Here are the top mistakes to watch out for and how to fix them:
| Mistake | Why It Happens | How to Fix It |
|---|---|---|
| Overwhipping the cream | Cream turns to butter | Stop as soon as soft peaks form |
| Adding warm gelatin to cold cream | Causes clumping | Cool gelatin before folding it in slowly |
| Skipping the chilling time | Mousse won’t set properly | Chill at least 2 hours (overnight is best) |
| Using imitation vanilla | Flat flavor, artificial taste | Always choose pure extract or vanilla bean |
| Stirring instead of folding | Deflates whipped cream | Gently fold to preserve airiness |
Tip: Don’t panic if your mousse turns slightly runny. Pour it into popsicle molds and freeze it into creamy vanilla mousse pops!
Expert Techniques to Upgrade Your Dessert Game
Want your vanilla mousse to taste and look like it came out of a French patisserie? Try these advanced tips:
1. Infuse Your Cream
Heat a small portion of your cream with a split vanilla bean pod, then cool it before whipping. This creates a deeply infused mousse that’s fragrant and luxurious.
2. Use Gelatin Sheets Instead of Powder
Professional chefs prefer gelatin sheets for a more refined texture. Bloom 1 sheet per cup of cream.
3. Pipe with Precision
For plated desserts or parfaits, use a piping bag with star or round tips. This gives your mousse a clean, bakery-level finish.
4. Layer with Contrasting Textures
Pair your mousse with crunchy praline, crisp wafers, or moist cake for a multi-sensory experience.
5. Use a Springform Mold for Layered Cakes
Want mousse as a filling or topping in a cake? Build your cake inside a springform pan, chill it overnight, and remove the ring for a perfectly smooth edge.
These tips don’t just improve the mousse — they turn it into a signature dessert that guests will remember.
FAQs
How to make vanilla mousse?
To make vanilla mousse, you’ll need heavy whipping cream, sugar, and vanilla (extract, paste, or bean). The cream is whipped until soft peaks form, then sweetened and flavored with vanilla. For a firmer texture or use in cakes, you can stabilize it with gelatin. Chill for at least two hours before serving.
Quick tip: Fold gently to keep the mousse airy and avoid overmixing.
What is vanilla bean mousse?
Vanilla bean mousse is a premium version of vanilla mousse that uses the seeds from real vanilla pods instead of extract. These seeds give it a deeper, richer aroma and visible black specks throughout. It’s ideal for high-end desserts, wedding cakes, and recipes where flavor and presentation are equally important.
How to make vanilla mousse filling for cake?
To make mousse suitable for filling cakes:
Use the classic vanilla mousse recipe.
Add stabilizers like gelatin to ensure it holds up between layers.
Chill well before and after layering in the cake.
Build the cake in a mold or springform pan for clean stacking.
This method ensures your mousse won’t collapse or leak, especially in multi-tiered cakes.
Conclusion: Master the Art of Vanilla Mousse
Vanilla mousse isn’t just a dessert — it’s a versatile canvas for creativity. From its basic form to gourmet variations like vanilla bean mousse or white chocolate twists, this smooth and airy treat belongs in every home baker’s repertoire. Whether you’re layering it into cakes, piping it into glasses, or scooping it by the spoonful, the techniques shared in this guide will ensure your mousse is always picture-perfect and crowd-pleasing.
Looking for more dessert ideas? Learn more about how textures shine in our White Chocolate Mousse and Vegan Chocolate Mousse Cake!
Fore more recipes follow me in Facebook, medium and Pinterest