Pavlova Cookie—that’s the name I whisper every time someone asks me what dessert feels like a cloud but tastes like a dream. I’m Mary, known around Bath as The Pudding Lady, and this particular treat has quickly become a star at my little weekend pudding club.
My love for baking started in my mother’s pantry, where golden syrup stuck to every surface and flour tins doubled as treasure chests. I never trained as a pastry chef—I was too ambitious and far too clumsy for that—but I baked anyway. And oh, how I baked. From treacle puddings that shone like lacquered wood to Victoria sponges that collapsed into jammy bliss, I lived for the sweet smell of sugar in the oven.
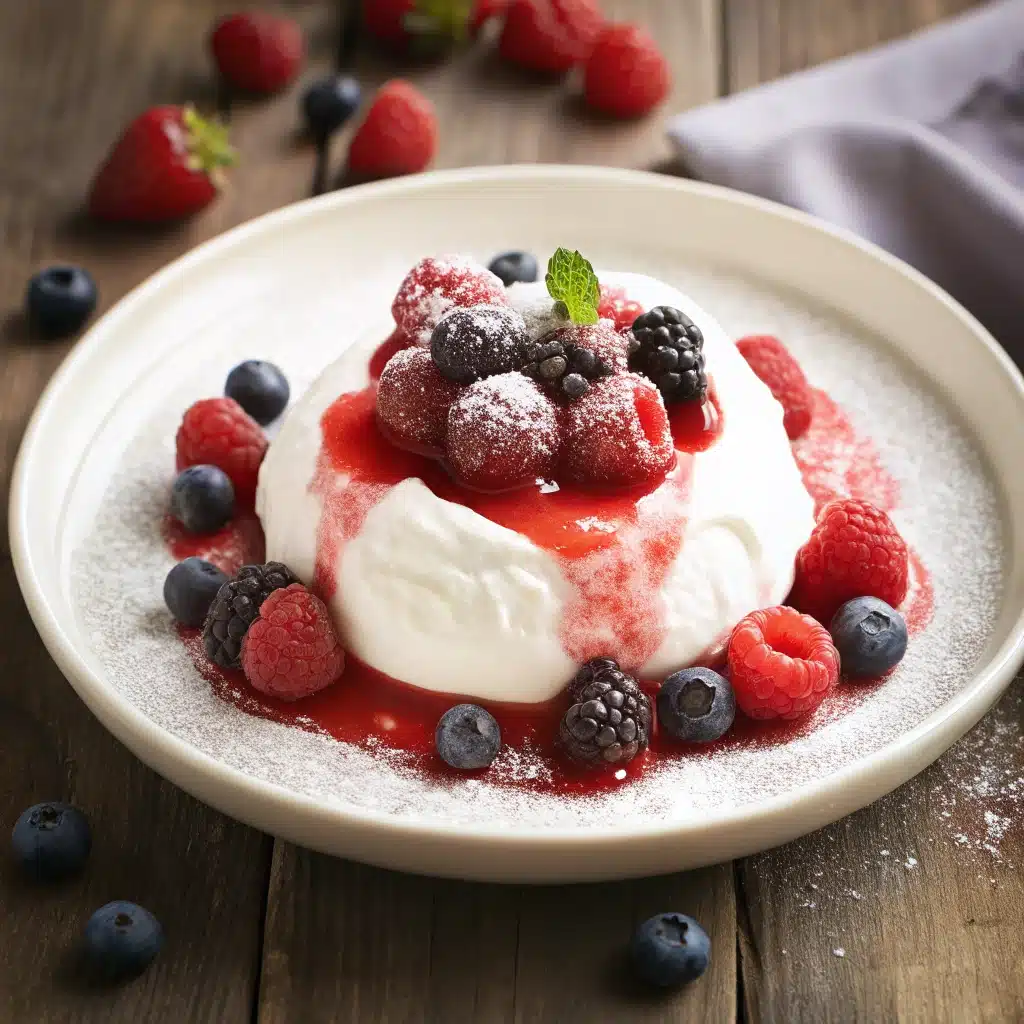
But when I discovered the Pavlova Cookie, it changed everything. Crisp on the outside, melt-in-your-mouth inside, with whipped cream clouds and bursts of fresh fruit or citrus zest on top—it’s like a miniature pavlova with the charm and convenience of a cookie. It’s elegant, light, and just the right amount of indulgent.
Today, the Pavlova Cookie is more than just a recipe—it’s a symbol of how something simple can be extraordinary. And in this article, I’ll take you through everything I’ve learned from dozens of batches and years of pudding expertise: how to know when your pavlova is perfectly baked, the best toppings, meringue beating tips, flavor profiles, and so much more.
Table of Contents
Understanding Pavlova Cookies
What Is a Pavlova Cookie?
A Pavlova Cookie is a bite-sized twist on the classic pavlova, crafted from fluffy whipped egg whites and sugar to create a crisp, airy treat. These cookies are shaped into individual dollops and baked at a low temperature until the exterior hardens into a delicate shell while keeping the inside soft and airy — similar to a marshmallow.
Unlike the traditional pavlova, which is typically cake-sized and often filled with cream and fruit, the cookie version offers convenient, handheld portions ideal for parties, holiday trays, and dessert platters.
The name “Pavlova” is inspired by the Russian ballerina Anna Pavlova and pays homage to her light, graceful style — a theme echoed in the delicate texture of these cookies.
Pavlova cookies strike the perfect balance between structure and softness, making them a luxurious yet manageable alternative to traditional cakes or overly dense cookies.
Print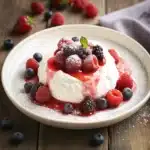
Pavlova Cookie
- Total Time: 1 hour 25 minutes
- Yield: 12 cookies 1x
Description
Crispy on the outside, soft and marshmallowy inside, these pavlova cookies are a delicate meringue-based treat topped with whipped cream and fresh fruit.
Ingredients
- 4 large egg whites, room temperature
- 1 cup granulated sugar
- 1/2 teaspoon cream of tartar
- 1 teaspoon vanilla extract
- 1/4 teaspoon salt
- Whipped cream, for topping
- Fresh fruit (strawberries, kiwi, berries), for garnish
Instructions
- Preheat oven to 250°F (120°C). Line a baking sheet with parchment paper.
- In a clean mixing bowl, beat egg whites with cream of tartar and salt until soft peaks form.
- Gradually add sugar, one tablespoon at a time, beating on high speed until stiff, glossy peaks form.
- Gently fold in vanilla extract.
- Spoon or pipe small rounds onto the baking sheet, leaving a slight well in the center of each for toppings.
- Bake for 60–70 minutes, then turn off the oven and let cookies cool inside with the door ajar for 1 hour.
- Top with whipped cream and fresh fruit before serving.
Notes
Make sure no yolk gets into your egg whites or the meringue won’t whip properly. Store cookies in an airtight container before topping.
- Prep Time: 15 minutes
- Cook Time: 1 hour 10 minutes
- Category: Dessert
- Method: Baking
- Cuisine: Australian
Nutrition
- Serving Size: 1 cookie
- Calories: 90
- Sugar: 15g
- Sodium: 30mg
- Fat: 0g
- Saturated Fat: 0g
- Unsaturated Fat: 0g
- Trans Fat: 0g
- Carbohydrates: 18g
- Fiber: 0g
- Protein: 2g
- Cholesterol: 0mg
The Difference Between Pavlova and Meringue Cookies
Although pavlova cookies and meringue cookies share key ingredients, they differ in texture and purpose:
| Feature | Pavlova Cookie | Meringue Cookie |
|---|---|---|
| Texture | Crisp shell with soft, marshmallow inside | Dry and crispy throughout |
| Baking Temperature | Lower, slower to preserve moisture | Higher to dry out fully |
| Use | Often topped with cream, fruit, or curd | Served plain or dipped in chocolate |
| Sugar Ratio | Higher, for softer interior | Slightly lower, for total crispness |
| Origin | Based on Australian/New Zealand dessert | Rooted in European confectionery |
Pavlova cookies embrace softness in their center, aiming for a rich texture contrast, while meringue cookies are all about crunch.
Check out our twist on cookie classics with Cupcake Oreos — another creative dessert spin!
Ingredients

Essential Ingredients for the Perfect Texture and Flavor
Getting Pavlova Cookies just right starts with the right ingredients. While the list may seem simple, each component plays a critical role in achieving the ideal texture — that crisp exterior and soft, marshmallowy center.
Here’s what you’ll need:
| Ingredient | Purpose | Tips for Best Results |
|---|---|---|
| Egg Whites | Provides structure and stability | Use room-temperature, fresh eggs for optimal volume |
| Granulated Sugar | Sweetens and stabilizes meringue | Add slowly, about 1 tbsp at a time, to fully dissolve |
| Cornstarch | Helps maintain softness inside | Sift into the mixture to prevent clumps |
| Cream of Tartar | A stabilizer that prevents weeping | Optional but recommended, especially in humid areas |
| Vanilla Extract | Enhances flavor with a warm aroma | Use pure vanilla for the best taste |
| White Vinegar or Lemon Juice | Helps set the meringue structure | Adds acid to strengthen egg whites and reduce cracking |
Some bakers also incorporate a small pinch of salt or a few drops of food coloring to customize appearance and enhance flavor balance.
Pro Tip: Never use plastic bowls when beating egg whites. Even trace oils can ruin your meringue. Stick with glass or stainless steel for best results.
Discover great ideas like Strawberry Simple Syrup to drizzle over your finished pavlova cookies.
Tools You Need to Make Pavlova Cookies at Home
Making pavlova cookies doesn’t require high-end gear, but a few kitchen essentials can elevate your results significantly:
Must-Have Tools:
- Electric Mixer (Stand or Handheld)
Essential for beating egg whites to stiff peaks. Whisking by hand is possible but time-consuming and inconsistent. - Mixing Bowls
Always use a clean, dry glass or metal bowl—any hint of moisture or grease can stop the egg whites from whipping to stiff peaks. - Baking Sheet & Parchment Paper
Prevents sticking and helps the cookies bake evenly. Avoid silicone mats which may trap moisture. - Sifter or Fine Mesh Strainer
To incorporate cornstarch evenly into the meringue mixture. - Spatula or Piping Bag
For shaping your cookies. You can spoon rustic dollops or use a piping bag for more elegant designs. - Oven Thermometer
Optional but useful. Pavlova cookies require consistent low heat, and many home ovens can be off by 10–20°F. - Cooling Rack
Allows cookies to cool without collecting condensation underneath.
Check out our decadent layering techniques in Heavenly Chocolate Cheesecake Trifle — where precision tools also make the difference.
Step-by-Step Guide to Making Pavlova Cookies
How to Whip Egg Whites for Stable Meringue
The foundation of any great Pavlova Cookie lies in perfectly whipped egg whites. This step can make or break your cookies — too soft and they collapse, too stiff and they’ll crack or dry out.
Here’s a foolproof process to whip the perfect meringue:
- Start with Room-Temperature Egg Whites
Cold eggs won’t whip properly. Let them sit at room temperature for 30–60 minutes before starting. - Use a Clean, Oil-Free BowlStick with glass or stainless steel bowls—plastic can hold onto grease and sabotage your meringue.
- Begin at Low Speed
Whisk the egg whites on low to medium speed until they turn foamy and start to form bubbles. This helps build a strong protein network. - Add Cream of Tartar or Vinegar (Optional)
About 1/4 teaspoon of cream of tartar or 1/2 teaspoon of vinegar helps stabilize the foam and prevent weeping. - Gradually Add Sugar
Add 1 tablespoon at a time, allowing each spoonful to dissolve before adding more. This process takes 7–10 minutes. - Look for Glossy Stiff Peaks
Stop mixing when the meringue is glossy and holds its shape when you lift the whisk. The peaks should stand tall and firm without bending or curling when you lift the whisk. - Gently Fold in Cornstarch and Vanilla
Use a spatula to fold in these ingredients without deflating the mixture.
Pro Tip: Rub a pinch of meringue between your fingers. If you feel sugar granules, keep beating — it’s not ready yet.
Baking Pavlova Cookies to Crisp Perfection
Baking pavlova cookies is a delicate process — low heat and patience are your best friends.
Follow this step-by-step method:
- Preheat Your Oven to 225°F (105°C)
Baking at a low temperature allows the exterior to crisp up while keeping the inside soft and marshmallow-like. - Line Your Baking Sheet with Parchment Paper
This prevents sticking and allows even baking. - Spoon or Pipe the Meringue onto the Sheet
Create evenly sized dollops or nest shapes, about 2–3 inches in diameter. Leave space between each one. - Bake Low and Slow (60–75 Minutes)
Bake until the outer shells are dry to the touch and develop a faint cream hue—this signals they’re perfectly set. They should lift off the paper easily. - Turn Off the Oven and Let Them Cool Inside
Let cookies cool in the oven with the door closed for at least 1 hour. This prevents cracking from sudden temperature changes. - Remove and Store in an Airtight Container
Once cooled, store pavlova cookies in a dry, airtight container. Avoid humid environments.
Looking for a sweet topping idea? Don’t miss our Marshmallow Frosting recipe — a cloud-like partner for pavlova cookies!
How to Know When Pavlova Cookies Are Baked
Visual and Texture Cues to Tell Doneness
Knowing exactly when your Pavlova Cookies are done can feel tricky — they’re not like regular cookies that turn golden brown. Instead, the clues are more subtle, and they depend on both how they look and feel.
Here’s how to tell if your pavlovas are ready to come out of the oven:
- Dry to the Touch
Gently tap the outside with your fingertip — it should feel dry and crisp, not sticky or tacky. - No Visible Gloss
Properly baked meringue loses its wet sheen and looks matte with a soft ivory or white hue. - They Lift Off Easily
Carefully lift one from the parchment paper. If it comes off cleanly without resistance, it’s done. - Light Hollow Sound
Gently tap the bottom—it should produce a slightly hollow sound, indicating the Pavlova Cookie is done baking. That’s your sign the inside has cooked enough to hold its shape. - Time Frame
At 225°F (105°C), pavlova cookies generally bake for 60–75 minutes depending on their size and oven consistency. - Cool in Oven to Prevent Cracks
Once baked, don’t rush the cool-down. Let them sit in the oven with the door closed for at least 1 hour to prevent sudden cracking from temperature shock.
Still unsure? Bake a test cookie and break it open after cooling — the interior should be soft and marshmallowy but not sticky or gooey.
Common Mistakes That Lead to Undercooked Pavlovas
Even experienced bakers sometimes underbake their pavlovas. Let’s troubleshoot what can go wrong and how to fix it:
| Mistake | Result | Fix It With… |
|---|---|---|
| Baking at too high temperature | Browning or cracking | Lower oven temp to 225°F |
| Removing too early | Sticky interior or collapsed shape | Add 15–20 more minutes baking time |
| Not allowing to cool in oven | Sudden cracks and sinking | Leave in oven at least 1 hour |
| Too much moisture in meringue | Leaking, chewy cookies | Beat whites longer and bake longer |
| Baking in humid conditions | Sticky exterior or chewy shells | Bake on a dry day or use a dehumidifier |
Humidity and improper sugar incorporation are the top culprits behind soft or leaking pavlova cookies.
For more beautifully soft yet structured desserts, check out our dreamy Labubu Cake — another example of balanced textures done right.
Topping Ideas and Creative Serving Tips
What Is the Best Topping for Pavlova Cookies?
The beauty of a Pavlova Cookie lies not just in its texture but in its topping versatility. These light, airy treats pair perfectly with an endless variety of toppings — from tangy fruits to rich creams.
Here are the best options to top your pavlova cookies and wow any crowd:
1. Fresh Fruit
Juicy, tart fruits are the perfect match for pavlova, balancing its sweetness with a refreshing zing.
| Best Fruits to Use | Why They Work |
|---|---|
| Strawberries | Sweet and slightly acidic, classic pairing |
| Raspberries | Tangy kick, beautiful color contrast |
| Kiwi | Tropical and bright, balances sweetness |
| Blueberries | Mild and juicy, adds texture |
| Passion Fruit | Exotic flavor with natural tartness |
Tip: Slice fruit thin to avoid weighing down the delicate cookie.
2. Whipped Cream or Chantilly Cream
Lightly sweetened whipped cream is a traditional pavlova topping that enhances the marshmallow center.
- Use heavy cream with at least 36% fat for stability
- Add a splash of vanilla or a touch of citrus zest to elevate the flavor with a bright, aromatic twis
- Pipe or dollop the meringue before adding fruit—this creates a stable base to anchor your toppings securely
3. Lemon or Berry Curd
A tart curd adds richness and tang that contrasts beautifully with sweet pavlova.
- Lemon curd: Classic choice with brightness
- Raspberry or blackberry curd: Adds a jewel-toned aesthetic and sharp flavor
4. Chocolate Drizzle or Shavings
For chocolate lovers, add:
- Dark chocolate drizzle
- White chocolate curls
- Cocoa nibs for crunch
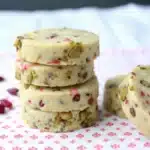
5. Nuts and Seeds
Add a nutty element for a crunchy finish.
- Crushed pistachios
- Toasted almonds
- Poppy seeds
Pro Tip: Avoid wet toppings like syrups or overly juicy fruits unless serving immediately, as they’ll soften the meringue shell.
Don’t miss our Dubai Chocolate Recipe for topping inspiration with a rich cocoa twist.
Seasonal and Holiday-Inspired Pavlova Garnishes
Take your Pavlova Cookie game to the next level with themed or seasonal flair. These make pavlovas perfect for any occasion:
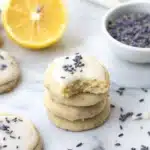
Spring / Easter:
- Mini chocolate eggs
- Edible flowers (lavender, violets)
- Lemon zest whipped cream
Summer:
- Tropical fruit medley (pineapple, mango, coconut flakes)
- Berry compote and mint leaves
Fall:
- Spiced whipped cream (cinnamon, nutmeg)
- Caramel drizzle with apple slices
Winter / Holidays:
- Pomegranate seeds and sugared rosemary
- Crushed candy canes with white chocolate
- Cranberry-orange zest and gold sprinkles
Serving Suggestion: Arrange pavlova cookies on a tiered tray with toppings served buffet-style for a DIY dessert bar. It’s interactive and lets guests customize their bites!
Discover more layering and topping ideas in our rich Cookie Dough Cheesecake for creamy, sweet textures that also pair beautifully with pavlova cookies.
Troubleshooting Pavlova Cookies
Why Your Pavlova Cracks or Collapses
Even experienced bakers face issues with Pavlova Cookies — they can crack, collapse, or get sticky for a variety of reasons. Understanding what’s going wrong is key to improving your results.
Let’s troubleshoot the most common problems:
1. Cracks on the Surface
Cracks typically appear when there’s a sudden temperature shift or the meringue is overbaked.
| Cause | Solution |
|---|---|
| Cooling too quickly | Let pavlovas cool gradually in the oven |
| Oven temperature too high | Bake low and slow (225°F/105°C is ideal) |
| Over-whipped egg whites | Stop at stiff peaks, not dry peaks |
Fix: Bake longer at a lower temp and cool in the oven.
2. Sunken or Collapsed Cookies
This usually happens when the structure isn’t stable enough.
| Cause | Solution |
|---|---|
| Under-beaten egg whites | Beat until glossy stiff peaks |
| Too much sugar added too quickly | Add sugar slowly while whipping |
| Excess moisture in mixture | Avoid baking on humid days; don’t add wet toppings |
Fix: Test peaks before baking and monitor humidity levels.
3. Sticky or Gummy Centers
Soft interiors are great — but sticky or wet? Not so much.
| Cause | Solution |
|---|---|
| Undercooked meringue | Bake 10–15 minutes longer |
| Oven temp too low | Confirm with oven thermometer |
| Poor air circulation | Don’t overcrowd the baking sheet |
Fix: Let the cookies cool completely before checking texture.
4. Weeping (Liquid Seeping Out)
This can happen during or after baking and affects texture.
| Cause | Solution |
|---|---|
| Sugar not fully dissolved | Beat until no grains remain between fingers |
| Humid conditions | Use a dehumidifier or bake on dry days |
| Stored improperly | Keep in airtight container once fully cooled |
Fix: Ensure sugar dissolves completely and store correctly.
Don’t miss our Shoney’s Strawberry Pie for more fruit-and-meringue combo ideas that hold shape beautifully — even in humidity.
How Humidity Affects Pavlova Cookies and How to Prevent It
Meringue is highly sensitive to moisture — especially in the air. High humidity can ruin pavlovas by making them chewy, sticky, or weepy.
Here’s how humidity wreaks havoc:
- Sugar in meringue absorbs moisture from the air
- This breaks down the dry shell and softens it too quickly
- The interior never fully sets
How to bake pavlova cookies in humid weather:
- Bake on a dry day if possible
- Use an air-conditioned or dehumidified kitchen
- Bake in the evening or early morning when humidity is lower
- Avoid boiling water or cooking on the stovetop nearby
- Let the meringues cool in the oven with the door slightly ajar—this helps release trapped steam and prevents cracking
Storage Tip: After cooling, place cookies in an airtight container with silica packets (or dry uncooked rice) to absorb excess moisture.
Humidity giving you trouble with other bakes too? Try our Fruit Cupcakes for a more forgiving dessert that still packs freshness and color.
Pavlova Cookie Taste and Texture Explained
What Does Pavlova Taste Like?
If you’ve never had a Pavlova Cookie, imagine biting into a sweet cloud — crisp on the outside with a soft, pillowy interior that almost melts in your mouth. The flavor is light, subtly sweet, and delicate, making it the perfect base for rich creams or tart fruits.
Key Taste Notes:
- Sweetness: Pavlova cookies are definitely sweet, but not overwhelmingly so. The sugar supports the structure and balances toppings like tangy fruits or citrusy curds.
- Vanilla Essence: A touch of vanilla (or almond extract, if preferred) adds warmth and complexity to the otherwise simple profile.
- Mild Egginess: When properly baked, there’s no “eggy” flavor, just a gentle, neutral base that plays well with toppings.
Unlike heavier desserts, pavlova cookies leave your palate feeling refreshed rather than weighed down. That’s why they pair so well with seasonal fruit and are ideal after rich meals.
Pro Tip: Avoid adding chocolate or caramel directly into the meringue — it can alter the texture. Instead, drizzle these on top for flavor contrast without compromising structure.
How the Cookie Form Changes the Classic Pavlova Flavor
While traditional pavlova is made as a large single cake or base topped with cream and fruit, Pavlova Cookies transform that concept into a refined, manageable bite-sized treat. But the form does impact flavor and experience:
| Feature | Classic Pavlova Cake | Pavlova Cookie |
|---|---|---|
| Serving Style | Sliced or spooned | Individually portioned |
| Texture Balance | Marshmallow inside, crispy shell | Slightly more crisp due to smaller size |
| Topping Distribution | Centralized, often heavy | Lighter and evenly spread per cookie |
| Taste Concentration | Denser center, stronger vanilla | Crisp exterior offers toasted flavor |
Cookies bake faster and have a higher crisp-to-soft ratio than the cake version, so they offer more textural contrast in each bite. Some may even prefer this version for the added crunch and easier serving.
Looking for a creamy and balanced dessert with complementary texture? Discover our Biscoff Cheesecake (No Bake) — it’s an ideal pairing with pavlova cookies on a dessert platter.
How Long to Beat Meringue for Cookies
Timing Meringue Peaks: Soft vs. Stiff Peaks
The most important step when making Pavlova Cookies is beating the egg whites properly. The structure, rise, and texture of your cookies all hinge on how well you whip your meringue. Let’s break down how long you should beat and what you should look for during the process.
Step-by-Step Timing Guide:
- Start Mixing (0–2 minutes):
Beat on low to medium speed until the egg whites become foamy. - Add Stabilizers (2–3 minutes):
Add cream of tartar or vinegar. Continue whisking until the egg whites form soft peaks that gently fold over when the whisk is lifted. - Begin Adding Sugar (3–7 minutes):
Gradually add sugar, 1 tablespoon at a time. Beat on medium-high. - Watch for Glossy, Stiff Peaks (7–10 minutes):
You’ve reached the ideal point when the meringue is:- Thick and glossy
- Forms stiff peaks that stand straight up
- Has no visible sugar granules (test between fingers)
Total Beating Time: 7 to 10 minutes
Too short? Your meringue will be too soft and collapse. Too long? It becomes dry, grainy, and difficult to pipe.
Pro Tip: If your meringue forms a peak that bends or droops — keep going. True stiff peaks should not move.
Signs Your Meringue is Over- or Under-Beaten
Let’s look at the symptoms of a meringue gone wrong and how to fix it:
| Condition | Signs | Fix / Prevention |
|---|---|---|
| Under-beaten | Wet, soft peaks that collapse easily | Beat longer, add sugar more gradually |
| Over-beaten | Dry, chunky, curdled texture | Stop beating as soon as peaks stiffen and shine |
| Just right | Glossy, holds stiff peaks, smooth | Sugar fully dissolved, no grainy feel |
What Happens If You Overbeat?
Over-beating breaks down the proteins in egg whites. Instead of a smooth mixture, you get a clumpy foam that won’t bake properly and may weep or crack.
What If You Underbeat?
The mixture won’t hold its shape, and cookies will spread flat and sticky instead of rising into crisp, light shells.
Searching for easy desserts that skip the tricky meringue steps? Try our ultra-easy Tiramisu Brownies — a great backup when the meringue just isn’t cooperating.
Storing, Freezing, and Making Ahead
How to Store Pavlova Cookies Without Losing Crispness
Because Pavlova Cookies are made from meringue, they’re extremely sensitive to moisture. To keep that crisp exterior and marshmallow-soft center intact, storage needs to be handled with care.
Here’s how to properly store your pavlova cookies:
1. Cool Completely Before Storing
Let cookies cool in the oven for at least an hour. Transferring them too early can trap steam and create sogginess.
2. Use an Airtight Container
Store cookies in a dry, airtight container at room temperature. Add a layer of parchment paper between stacks to avoid sticking.
3. Keep Away From Humidity
Store them in the driest part of your kitchen. Avoid storing near stoves, dishwashers, or windows.
4. Add a Moisture Absorber
Place a few grains of uncooked rice or a small silica packet inside the container to absorb any humidity.
| Storage Method | Shelf Life | Texture Preserved? |
|---|---|---|
| Airtight container | 3–5 days | Yes |
| Refrigeration (not advised) | Up to 1 week | No (softens meringue) |
| Freezer (see below) | 1 month | With care |
Can You Freeze Pavlova Cookies? Tips for Make-Ahead Success
Freezing pavlova cookies can be tricky, but it’s possible with proper precautions.
How to Freeze Pavlova Cookies:
- Cool completely — very important.
- Wrap individually in parchment or wax paper.
- Place in an airtight freezer-safe container.
- Freeze flat to prevent breakage.
Thawing:
- Let cookies come to room temperature inside the container.
- Do not unwrap while frozen — condensation can make the surface sticky.
Important: Never freeze pavlova cookies with toppings. Only freeze the bare shells.
Make-Ahead Timeline:
- Bake 2–3 days ahead and store in airtight container.
- Freeze up to 1 month ahead, thaw 1–2 hours before serving.
- Add toppings just before serving to preserve structure.
Want a prep-friendly dessert that also stores well? Don’t miss our Vanilla Cake with Raspberry Filling — another make-ahead star for celebrations and parties.
Conclusion
Pavlova Cookies aren’t just elegant — they’re fun, flavorful, and customizable for any occasion. From understanding meringue science and baking techniques to picking the perfect toppings and troubleshooting humidity issues, this guide equips you with everything you need to master these airy confections.
Whether you’re hosting a summer soirée, baking for the holidays, or simply treating yourself to something sweet, pavlova cookies bring a delicate charm to every dessert table. With a bit of patience and precision, your cookies will come out crisp, cloud-like, and crowd-pleasing.
Don’t miss our Romantic Chocolate and Strawberry Cupcakes — a dreamy pairing with pavlova cookies for date nights or special occasions.
Fore more recipes follow me in Facebook, medium and Pinterest
FAQs
How to know when pavlova is baked?
Your pavlova cookies are ready when the exterior is crisp and dry to the touch, but the base lifts easily from parchment paper. There should be no visible gloss, and the bottom will sound slightly hollow when tapped. Always let them cool in the oven to prevent cracking.
What is the best topping for pavlova cookies?
Fresh fruit (like strawberries or kiwi), whipped cream, lemon curd, and crushed pistachios are top choices. These toppings bring color, flavor contrast, and visual appeal without overwhelming the light texture.
How long do you beat meringue cookies?
Typically, 7 to 10 minutes. Beat the egg whites until they form stiff, glossy peaks and the sugar is fully dissolved. Over- or under-beating can lead to collapsed or cracked cookies.
What does pavlova taste like?
Pavlova cookies are lightly sweet with a toasted vanilla flavor. The outside is crisp, while the inside is soft and marshmallow-like. When paired with tart toppings like fruit or lemon curd, they offer a perfectly balanced bite.