I’m Mary, from the charming city of Bath, where the roses bloom early and baking fills every corner of my kitchen. People around here call me “The Pudding Lady,” a name I’ve earned with love and layers of sponge. To me, dessert is never just dessert—it’s a memory in the making. And when it comes to desserts that always bring joy, nothing beats a mini chocolate cake.
From my first days in the pantry beside my mum—where the golden syrup dripped from spoons and flour dust floated in the air—I was hooked. While I’ve made everything from towering Victoria sponges to dark, sticky treacle puddings, the mini chocolate cake remains one of my most requested and personally beloved recipes. It’s small, simple, and deeply satisfying.
Every weekend, I host a six-person pudding club in my own flour-covered kitchen. No matter the season, we often find ourselves gathered around the oven, waiting for our mini chocolate cake to rise. There’s just something perfect about its size. It bakes fast, cools quicker, and always delivers that soft, rich bite that chocolate lovers dream about.
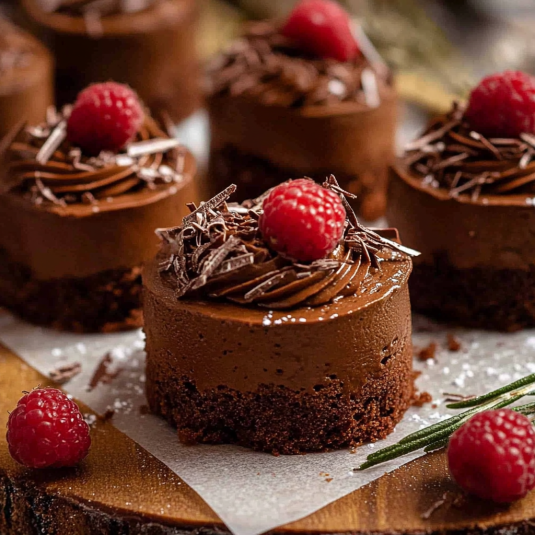
Table of Contents
Table of Contents
What is a Mini Chocolate Cake?
Understanding Mini Chocolate Cakes
A mini chocolate cake is exactly what it sounds like—a smaller version of the classic chocolate cake, typically baked in 4- or 6-inch pans, ramekins, or even muffin tins. These mini desserts aren’t just charming—they’re also incredibly practical for serving and portion control. Perfectly sized for two to four servings, mini cakes let you enjoy dessert without the leftovers (or guilt). They’re ideal for intimate dinners, small family gatherings, or portion control when you just need a quick chocolate fix.
Because of their size, they bake faster, cool quickly, and often require less prep and cleanup. That makes them great for beginner bakers or anyone tight on time.
Print
Mini Chocolate Cake – The Sweetest Little Indulgence You’ll Ever Bake
- Total Time: PT35M
- Yield: 2–4 1x
Description
Mini chocolate cake recipes, tips & decor ideas. Bake perfect mini cakes in minutes with our expert guide.
Ingredients
cup plain flour / all-purpose flour
1/3 cup cocoa , sifted (unsweetened, not dutch processed – Note 1)
3/4 tsp baking powder
3/4 tsp baking soda / bi-carb (Note 2)
1 cup white sugar
1/2 tsp cooking salt / kosher salt
1 large egg , at room temperature
1/2 cup milk , preferably full fat, at room temperature
1/4 cup plain oil , like vegetable, canola, peanut oil
1 tsp vanilla extract
1/2 cup boiling water
1 tsp instant coffee powder , option (Note 3)
Chocolate Buttercream
250g / 1 cup unsalted butter , softened
4 cups soft icing sugar / powdered sugar , sifted
1/2 cup cocoa powder , unsweetened
1 tsp vanilla extract
5 tbsp milk , preferably full fat
Instructions
1- Preheat oven to 180°C / 350°F (160°C fan-forced).
2- Baking pan – Butter a 40 x 28.5 x 2.5cm cm tray (15.8 x 11.3 x 1″ – US standard jelly roll pan) then line with baking paper (parchment paper).
Cake layers
1- Whisk dry – Sift the flour, cocoa, baking powder and baking soda into a bowl. Add the sugar and salt, then whisk to combine.
2- Mix in wet – Add the egg, milk, oil and vanilla. Whisk to combine. Dissolve the coffee in the hot water, then add into the batter. Whisk to combine. The batter will be VERY thin!
3- Bake – Pour into the pan and bake for 13 minutes.
4- Cool for 10 minutes then use the paper overhang to lift the cake onto a rack and cool for 30 minutes (leave it on the paper). Then refrigerate uncovered for at least 1 hour before cutting rounds (cake is too soft when freshly baked).
Assembling & frosting:
1- Cutting rounds – Cover the sticky surface with paper. Then flip upside down onto a cutting board (ie sticky side down). (Note 4) Peel the paper off the base. Then press out 21 x 6cm / 2.4″ rounds (or other size or shape as you desire).
2- Pipe frosting – Place a piece of cake on a small piece of paper, using a dab of frosting to stop it from sliding. Pipe coils of frosting on the layers, using 3 rounds for each cake. Pipe frosting around the sides and on the top. (A cake turntable is handy if you’ve got one but not essential.)
3- Smooth frosting – Smooth the frosting using a small offset spatula or knife, taking care to only touch the surface. Avoid touching the cake because it will dislodge crumbs that will end up in your frosting!
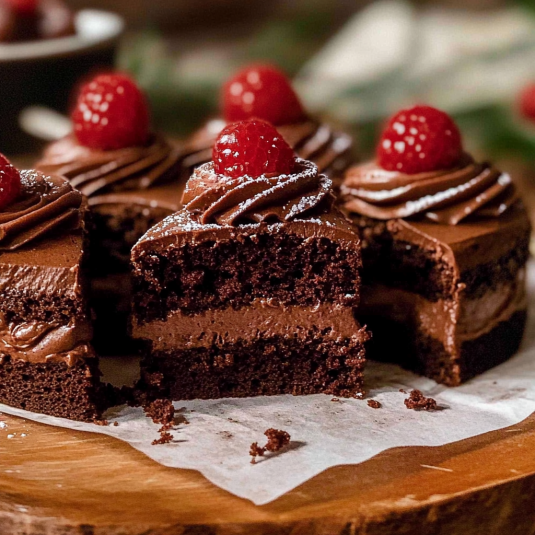
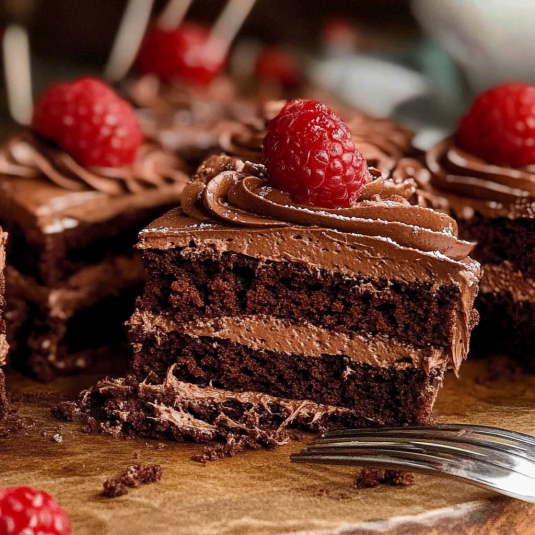
4- Decorate with piles of chocolate shards. I also used raspberries and rosemary for the photos in the post!
Chocolate buttercream:
1- Beat butter for 3 minutes on high until soft and fluffy. Add icing sugar in 3 lots. Beat it in, starting on low speed then increasing the speed (to avoid a snow storm). Once incorporated, add more icing sugar and repeat.
2- Beat 3 minutes – Once the icing sugar has all been added, added the cocoa powder, milk and vanilla. Beat again, starting on low speed then increasing the speed gradually. Once the cocoa is incorporated, beat on high for 3 minutes to make it really nice and fluffy.
3- Piping bags – Transfer to a piping bag for frosting. (This is the fastest and easiest way, trust me on this. Even a ziplock bag will work here).
Notes
Cocoa – This recipe calls for ordinary unsweetened cocoa powder, though the pricier dutch processed cocoa powder (which has more intense chocolate colour and flavour) can be used.
2. Baking soda – Can be substituted with 2 1/4 tsp extra baking powder (baking soda is an insurance policy to ensure even rise).
3. Coffee in chocolate is a common practice these days to enhance the chocolate flavour. You can’t taste it. Optional!
4. Flipping upside down is important to help cut out neat rounds because the surface of the cake is sticky so it sticks to the cutter and you end up with rather untidy circles.
5. Square or rectangle mini cakes – Easier to assemble and no cake scraps! Cut the cake into 3 equal rectangles. Frosting the layers to make one large 3 layer cake. Refrigerate for 1 hour to set the frosting (so it cuts neatly). Then cut into square or rectangles. Frost sides as desired (whip frosting again to re-fluff).
6. Storage: If leaving cooked cakes overnight, make sure it’s 100% cool then cover the top with paper (it’s sticky) then cling wrap. Refrigerate until required – you can actually do this 5 days ahead because the cake stays fresh for 5 days. Or freeze for 3 months.
Assembled cakes will stay fresh in the fridge for 5 days – the cake sponge has excellent shelf life!
- Prep Time: PT10M
- Cook Time: PT20M
- Category: Dessert
- Cuisine: American
Nutrition
- Calories: 280 kcal
- Sugar: 20g
- Sodium: 140mg
- Fat: 14g
- Saturated Fat: 3g
- Carbohydrates: 36g
- Fiber: 2g
- Protein: 4g
- Cholesterol: 40mg
Why People Love Mini Chocolate Cakes
Mini chocolate cakes have surged in popularity—and for good reason. Here’s why they’ve become a go-to treat:
- Perfectly Portion-Controlled: You’re not stuck with an entire cake tempting you all week.
- Customizable: They allow you to experiment with flavors, fillings, and frostings on a smaller scale.
- Ideal for Gifting: Wrap them in a small box or decorative wrap, and you have a charming homemade present.
- Effortless Presentation: Their small size makes them easier to decorate with precision and style.
Mini cakes also feel more personal. Serving someone their own cake—rather than a slice—feels special. It’s a thoughtful touch at events or romantic dinners that elevates the entire dessert experience.
Choosing the Right Ingredients for the Best Mini Chocolate Cake
High-Quality Chocolate and Cocoa Powders
When it comes to baking a rich and flavorful mini chocolate cake, the star ingredient—chocolate—matters more than you think. Unlike larger cakes that can mask lower-quality ingredients with volume, mini cakes expose every note of flavor in each bite. That’s why opting for high-quality chocolate and cocoa powder is essential—it makes all the difference in flavor and texture.
Here’s what to look for:
- Dutch-processed cocoa: Known for its deep color and smooth flavor, perfect for that classic rich taste.
- Bittersweet or semi-sweet chocolate (60-70% cacao): Provides intensity without being overly sweet.
- Steer clear of chocolate chips when melting, as they typically contain stabilizers that hinder smooth, even melting.
If you’re dairy-free, opt for high-quality vegan chocolate bars or cocoa powders with no milk derivatives.
Check out Chocolate Raspberry Cake to see how fruit and cocoa complement each other beautifully.
Essential Pantry Staples and Substitutes
Even the most basic ingredients play a crucial role in how your mini chocolate cake turns out. Here’s how to make smart choices:
| Ingredient | Best Option | Substitutes |
|---|---|---|
| Flour | All-purpose flour | Almond flour (for gluten-free), cake flour (for a finer crumb) |
| Sugar | Granulated white sugar | Coconut sugar, brown sugar (adds moisture & molasses notes) |
| Eggs | Room-temperature large eggs | Flax egg (for vegan), Greek yogurt (for moisture) |
| Fat | Neutral oil or unsalted butter | Avocado oil, melted coconut oil, or vegan butter |
| Leavening | Baking soda or powder | Make sure it’s fresh—test in vinegar (soda) or water (powder) |
| Liquid | Buttermilk or whole milk | Oat milk, almond milk, sour cream for tang and richness |
A dash of espresso powder can also deepen the chocolate flavor without making the cake taste like coffee. Just ½ tsp in the dry mix will do the trick.
Discover great ideas like the Dubai Chocolate Recipe for more exotic ingredient inspiration.
These ingredients form the foundation of your cake, so don’t cut corners here. When baking in small batches, precision is key—every gram counts.
Step-by-Step Mini Chocolate Cake Recipe
Ingredients List (Standard Small-Batch)
This recipe is crafted specifically for one 4-inch or 6-inch mini chocolate cake, serving 2–4 people. It’s rich, moist, and easy enough for both beginners and seasoned bakers.
Dry Ingredients:
- ½ cup all-purpose flour (spooned and leveled)
- ¼ cup Dutch-processed cocoa powder
- ¼ cup granulated sugar
- ¼ tsp baking soda
- ⅛ tsp salt
- ½ tsp espresso powder (optional, enhances chocolate flavor)
Wet Ingredients:
- ¼ cup whole milk (or plant-based milk)
- ¼ cup neutral oil (like canola or avocado)
- 1 large egg (room temperature)
- ¼ tsp vanilla extract
- ¼ cup hot water (to bloom the cocoa)
Optional Add-ins:
- ¼ cup mini chocolate chips or chunks
- 1 tbsp sour cream (for extra richness)
Yield: One 4- to 6-inch mini chocolate cake
Prep Time: 10 minutes
Bake Time: 20–24 minutes
Skill Level: Easy
Looking for inspiration? Try the Romantic Chocolate and Strawberry Cupcakes as a base to adapt this recipe for romantic occasions.
Popular Mini Chocolate Cake Variations
Mini Lava Cake & Molten Chocolate Centers
Want to turn your simple mini chocolate cake into something show-stopping? Meet mini lava cakes—individual-sized treats with decadent, molten centers that ooze rich chocolate the moment you dig in.
Here’s how to make it happen:
- Reduce bake time: Lava cakes are intentionally underbaked. Bake for 10–12 minutes at 425°F until the edges are firm but the center jiggles slightly.
- Use ramekins: Grease well and dust with cocoa powder to avoid sticking.
- Insert a ganache center: You can place a frozen chocolate truffle or a scoop of ganache into the center of the batter before baking to guarantee gooeyness.
- Let rest briefly before unmolding to avoid burns and keep the lava intact.
Optional Flavor Additions:
- Espresso powder for richness
- Sea salt on top for contrast
- Orange zest or chili for a kick
Don’t miss our Red Velvet Brownies for more indulgent molten dessert inspiration.
Mini Chocolate Cakes with Filling (Raspberry, Ganache, Peanut Butter)
Adding a surprise filling transforms your mini chocolate cake into something gourmet without much extra work. Here are a few fan-favorite options:
| Filling Type | How to Use | Flavor Profile |
|---|---|---|
| Raspberry Jam | Core a small section after baking and pipe it in | Tart, fruity contrast to rich chocolate |
| Chocolate Ganache | Add in layers or as a topping | Creamy, decadent, melt-in-your-mouth texture |
| Peanut Butter | Swirl into batter or stuff in center | Sweet-salty combo chocolate lovers crave |
| Caramel Sauce | Inject after baking or layer between | Sticky, rich sweetness |
| Marshmallow Creme | Fill with a piping bag | Sweet and nostalgic |
Storage Tip: Cakes with fresh fruit or cream fillings should be refrigerated and consumed within 2–3 days.
Filling your cakes adds depth and delight to every bite. Whether you’re planning a surprise or treating yourself, these variations offer playful twists on a classic.
Discover great ideas like Vanilla Cake with Raspberry Filling to learn how to work with fruity centers and layers.
Frosting, Glazing, and Decorating Ideas
Best Frostings for Mini Chocolate Cakes
The right frosting takes your mini chocolate cake from great to unforgettable. Because these cakes are small, a little goes a long way—so richness and texture matter.
Here are the best frostings that complement mini chocolate cakes:
- Chocolate Ganache
- Made with equal parts heavy cream and chocolate.
- Pourable when warm, thickens into a glossy glaze.
- Perfect for a shiny finish or drip effect.
- Classic Chocolate Buttercream
- Creamy, sweet, and pipeable.
- Beat butter, cocoa powder, powdered sugar, vanilla, and milk.
- Ideal for decorative swirls and rosettes.
- Cream Cheese Frosting
- Adds a slight tang that balances chocolate richness.
- Great with red velvet or peanut butter variations.
- Whipped Ganache
- Chill your ganache and whip it until fluffy.
- Lighter texture, intense flavor.
- Vegan Options
- Use coconut cream and dairy-free chocolate for ganache.
- Avocado-based frostings for a clean, nutritious spin.
Tip: Always let your mini cake cool completely before applying frosting. Warm cake = melted mess.
Check out the Vanilla Cake Recipe for inspiration on fluffy, frost-friendly layers.
Creative Decorating Tips for Any Occasion
Mini cakes don’t just taste amazing—they look adorable too. With a few simple touches, you can customize your cake for any celebration:
For Everyday Sweetness
- Dust with powdered sugar for a café-style look
- Top with fresh berries or chocolate shavings
For Birthdays
- Pipe mini rosettes around the edge using a star tip
- Add sprinkles or edible glitter for flair
For Romantic Dinners
- Use a heart-shaped mold
- Decorate with rose petals and gold leaf
For Holiday Themes
- Try candy cane crumbles for Christmas
- Add a festive touch with orange zest and a dark chocolate drizzle—perfect for Halloween or Thanksgiving celebrations.
For Kids
- Mini fondant animals or cartoon toppers
- Layered colors inside the mini cake
Pro tip: Always decorate on a chilled cake. It holds better and prevents frosting from sliding.
These ideas allow you to get creative while still working on a small, manageable canvas. With mini chocolate cakes, even simple designs make a big impact.
How to Bake, Store, and Cut Mini Chocolate Cakes
How Long Do You Bake Mini Cakes?
Mini cakes bake faster than traditional full-sized ones, but the exact time depends on the pan size, batter thickness, and oven accuracy.
| Cake Size | Temperature | Bake Time | Notes |
|---|---|---|---|
| 4-inch | 350°F (175°C) | 18–22 mins | Ideal for 2 servings |
| 6-inch | 350°F (175°C) | 22–26 mins | Serves 4–6, test at 22 mins |
| Ramekin/Lava | 425°F (218°C) | 10–12 mins | For molten centers, slightly underbake |
Key Tips:
- Always preheat your oven.
- Use the toothpick test to check doneness—it should come out with a few moist crumbs, not raw batter.
- Rotate halfway through for even baking if needed.
Don’t miss our Tiramisu Cake for another dessert that benefits from baking precision.
How to Store Mini Cakes Properly
Proper storage means your mini chocolate cake stays moist and tasty—even days later.
Short-Term (1–2 Days)
- Seal tightly with plastic wrap or place in an airtight container to keep your baked goods fresh.
- Keep at room temperature, away from direct sunlight or heat.
Medium-Term (3–5 Days)
- Refrigerate if the cake contains fresh fruit or cream-based frosting.
- Place in a sealed coStore in a sealed container to prevent the dessert from absorbing any unwanted refrigerator odors.
- Allow to come to room temperature before serving.
Long-Term (Up to 3 Months)
- Freeze individual layers or whole cakes (unfrosted) wrapped in plastic + foil.
- Defrost overnight in the fridge, then bring to room temp before decorating.
Pro Tip: Place parchment paper between frosted mini cakes to avoid sticking during storage.
How Do You Cut a Mini Cake Without Ruining It?
Cutting a mini cake seems simple… until you end up with crumbled slices or frosting smears. Here’s how to do it right:
- Use a hot knife – Run a sharp, thin knife under hot water, then wipe dry.
- Score before slicing – Lightly mark where you’ll cut to ensure even portions.
- Cut straight down – Avoid dragging the knife through; this distorts the layers.
- Clean between slices – Wipe the knife clean each time for neat results.
Optional Tools:
- Dental floss (unscented) for clean cake layers
- Cake cutting guides for even portioning
This technique also applies when you’re slicing layered or filled mini cakes, which can be more fragile.
Discover great ideas like the Tiramisu Cookies to see another treat where precision cutting improves presentation.
When and Where to Serve Mini Chocolate Cakes
Perfect Occasions for Mini Chocolate Cakes
Mini chocolate cakes are versatile, stylish, and appropriate for virtually any event. Thanks to their single-serve or duo-serve size, they strike the perfect balance between indulgence and elegance.
Here are the best occasions to serve them:
- Romantic Dinners
Shareable and intimate, a single mini chocolate cake with two forks is perfect for date night or anniversaries. - Birthdays and Celebrations
Mini cakes are a great alternative to cupcakes or large cakes, especially when you want to offer variety in flavors or decorations. - Weddings and Engagements
Use individually decorated mini chocolate cakes as centerpieces or favors. They’re stunning and eliminate cutting logistics. - Holiday Gatherings
Christmas, Valentine’s Day, Thanksgiving—mini cakes can be dressed up for the season and gifted in decorative boxes. - Tea Parties and Brunches
Served with coffee, tea, or even dessert wine, these cakes feel upscale without being over-the-top. - Solo Indulgence Moments
Because, yes—you deserve chocolate cake on a Tuesday afternoon too.
Don’t miss our Tres Leches Cake if you’re looking for another small cake with big event flair.
Serving Suggestions and Pairings
To make your mini chocolate cake even more memorable, serve it with the right pairings. A well-plated dessert adds a sense of refinement and brings the whole presentation together.
| Pairing | Why It Works |
|---|---|
| Espresso or dark roast coffee | Enhances the bitterness of chocolate |
| Whipped cream or crème fraîche | Lightens the richness |
| Raspberry coulis or fresh berries | Offers tart contrast and color |
| Sea salt flakes | Brings out deeper chocolate flavors |
| Vanilla bean ice cream | Classic pairing with warm or molten cakes |
| Dessert wines or port | Adds elegance and complements cocoa |
Presentation Tips:
- Use a drizzle of ganache or fruit sauce under the cake on the plate.
- Garnish with mint leaves or powdered sugar for a clean finish.
- Serve on individual saucers or mini cake stands for impact.
Troubleshooting Common Mini Cake Issues
Even the best bakers run into problems—especially with small-batch recipes like mini chocolate cakes. Because of their size, even slight measurement or timing errors can throw things off. Let’s go over the most common problems and the best ways to solve them.
Why Did My Mini Cake Sink?
A sinking center is a baker’s heartbreak. Fortunately, it’s avoidable once you know the cause.
Common Reasons:
- Underbaking: When the center isn’t fully baked, it can sink as it cools—make sure to check doneness with a toothpick before removing from the oven. Always check with a toothpick at the center.
- Overmixing the Batter: Mixing too vigorously introduces excess air, which can collapse during baking and lead to a dense or sunken cake.
- Too much leavening: Extra baking soda or powder causes the cake to rise fast and fall hard.
- Oven door opened too early: Changes in temperature can interrupt the rise.
Fixes:
- Measure leavening agents precisely with a level spoon.
- Mix batter just until combined.
- Avoid peeking until 80% of bake time has passed.
If you’re experimenting with fillings like ganache or jam, remember that added moisture can also affect rise—adjust bake time slightly.
How to Fix Dry or Crumbly Mini Chocolate Cakes
A dry mini cake is disappointing—especially when you’re expecting something moist and fudgy. Here’s how to bring back the moisture:
| Problem | Solution |
|---|---|
| Overbaking | Reduce bake time by 2–3 mins; check doneness earlier |
| Not enough fat | Increase oil or add 1 tbsp sour cream or Greek yogurt |
| Low sugar | Sugar binds moisture—don’t reduce it too much |
| Poor quality cocoa | Some low-fat cocoas dry out quickly—go for Dutch-processed |
| Storing incorrectly | Wrap in plastic wrap while warm to trap steam |
Quick Moisture Boost Hack:
If your baked cake is slightly dry, brush it with a little simple syrup (sugar + water mix) before frosting. It adds moisture without changing flavor.
Discover great ideas like Salted Chocolate Cake to explore how ingredients like butter and sea salt affect cake texture and moisture balance.
Mini Chocolate Cake Pro Baking Tips
How Long Will Chocolate Cake Keep?
Storage longevity depends on how your mini chocolate cake is made and stored. Here’s a general guide:
| Storage Method | Time | Notes |
|---|---|---|
| Room Temp | 2–3 days | Best for unfrosted or buttercream-frosted cakes in airtight container |
| Refrigerated | 4–5 days | Ideal for cream cheese frosting, ganache, or perishable fillings |
| Frozen | Up to 3 months | Wrap tightly in plastic and foil; thaw in fridge overnight |
Pro Tip: Always bring your cake to room temp before serving for the best flavor and texture.
How Long Do You Bake Mini Cakes?
This depends on your pan size, oven accuracy, and batter density:
- 4-inch cake: 18–22 minutes at 350°F
- 6-inch cake: 22–26 minutes at 350°F
- Lava cakes in ramekins: 10–12 minutes at 425°F
Test for doneness using a toothpick in the center—it should come out with moist crumbs.
Conclusion
Mini chocolate cakes are the perfect balance of indulgence, portion control, and elegance. Whether you’re baking for two, prepping for a holiday, or simply craving something chocolatey without the fuss of a full-sized cake, these tiny treats deliver every time. From understanding the ingredients to exploring creative fillings and decorations, this guide has equipped you with everything you need to master the mini.
You’ve learned how to:
- Choose high-quality cocoa and smart substitutions
- Perfect the baking time and storage techniques
- Experiment with exciting variations like molten centers or fruit-filled cores
- Troubleshoot common issues like sinking or dryness
- Pair and serve like a true pastry pro
Mini chocolate cakes might be small, but their impact—on the palate and the presentation—is huge.
Fore more recipes follow me in Facebook, medium and Pinterest
FAQs
How Long Do You Bake Mini Cakes?
This depends on your pan size, oven accuracy, and batter density:
4-inch cake: 18–22 minutes at 350°F
6-inch cake: 22–26 minutes at 350°F
Lava cakes in ramekins: 10–12 minutes at 425°F
Test for doneness using a toothpick in the center—it should come out with moist crumbs.
How Do You Store Mini Cakes?
Store them like pros do:
Short term (1–2 days): Airtight container at room temperature.
Medium term (3–5 days): Refrigerate, especially if filled with ganache or fruit.
Long term: Freeze tightly wrapped, unfrosted for best texture retention.
Always let your cake cool completely before wrapping or storing.
How Do You Cut a Mini Cake?
Here’s how to get clean, neat slices—even in tiny cakes:
Use a hot knife: Dip in hot water, wipe, then slice.
Score before slicing: Lightly mark where cuts will go for even servings.
Wipe the blade between cuts: Keeps slices sharp and clean.
For layered mini cakes, dental floss can make precise cuts without dragging.