Hello! I’m Mary, 35, and I live in Bath, where the roses bloom early, the neighbors bring jam in the summer, and I’m known (proudly) as “The Pudding Lady.” I’ve always believed that pudding isn’t just the end of a meal—it’s an exclamation point. It’s the thing people remember, the reason they smile on the way home.
My dessert journey began in my mother’s pantry—where flour floated in the air and tins of golden syrup lined the shelf. I wasn’t trained in pastry, but I baked as if I’d been born to do it. Over time, one recipe stood out not only in color but in flavor: Red Velvet Brownies. They’re bold, brilliant, and unforgettable.

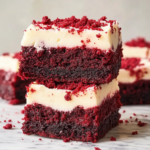
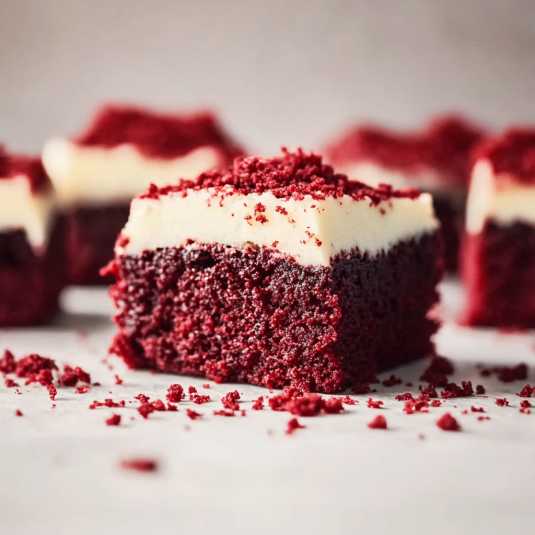
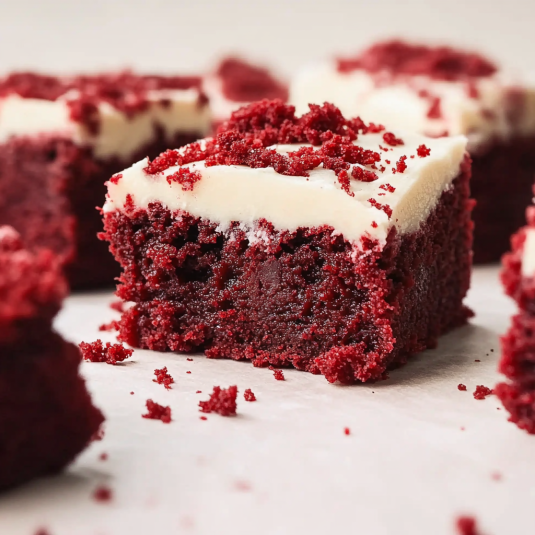
Red Velvet Brownies are everything you want in a dessert—rich like chocolate fudge, with the delicate tang of buttermilk and a soft, chewy center that melts on your tongue. The deep red hue makes them instantly eye-catching, but the flavor? That’s what keeps people coming back for seconds.
When I started offering baking classes from my kitchen, these Red Velvet Brownies became a club favorite. Whether for Valentine’s Day, dinner parties, or just a Tuesday night pick-me-up, they deliver a decadent treat in every bite.
Red Velvet Brownies –The Most Irresistible Dessert You’ll Ever Bake
- Total Time: PT40M
- Yield: 16 1x
Description
Perfectly fudgy Red Velvet Brownies, topped with delicious cream cheese frosting.
Ingredients
For the Red Velvet Brownies
¾ stick Unsalted Butter 85g
1 cup Granulated Sugar 200g
¼ cup Light Brown Sugar 55g
3 large Eggs
1 large Egg Yolk
1 teaspoon Vanilla Extract
⅓ cup Vegetable Oil 72g
¼ cup Cocoa Powder 25g
¾ cup All-purpose Flour 90g
1 tablespoon Vinegar
1 tablespoon Cornstarch
¼ teaspoon Salt
½ teaspoon Red Food Coloring
¾ cup White Chocolate Chips optional
For the Cream Cheese Frosting
4 oz Cream Cheese 114g
¾ stick Unsalted Butter 85g
4 cups Powdered Sugar 480g
1 teaspoon Vanilla Extract
Instructions
Make the Red Velvet Brownies
1- Line a 9-inch square cake pan with parchment paper and preheat the oven to 350°F / 180°C (160°C fan assisted).
2- Melt butter in the microwave in 30-second increments until completely melted.
¾ stick Unsalted Butter
3- Put the white sugar and light brown sugar in a large mixing bowl, then add the melted butter and whisk together until combined.
1 cup Granulated Sugar,¼ cup Light Brown Sugar
4- Add the eggs, egg yolk and vanilla and mix together. Be careful not to overmix – we are not trying to add air into the mixture as that will make the brownies cakey.
3 large Eggs,1 large Egg Yolk,1 teaspoon Vanilla Extract
5- Add the vegetable oil and the cocoa powder to the brownie batter and whisk together gently until completely combined – again we are not trying to incorporate air.
¼ cup Cocoa Powder
6- Take a couple of tablespoons of the batter and put them into a small bowl, add your red gel food coloring to this bowl and mix it in until the gel is all incorporated and there are no lumps. Add this mixture into the main bowl of batter and mix until combined.
⅓ cup Vegetable Oil,½ teaspoon Red Food Coloring
7- Switch from a whisk to a rubber spatula or wooden spoon and fold in the dry ingredients including flour, cornstarch and salt.
¾ cup All-purpose Flour,1 tablespoon Cornstarch,¼ teaspoon Salt
8- When there are no more lumps of flour, add the vinegar and mix in well.
1 tablespoon Vinegar
9- Optional: If you like, you can add some white chocolate chips at this stage. I decided I liked the brownies better without.
¾ cup White Chocolate Chips
10- Pour the brownie batter into the prepared cake pan and bake for 20 – 25 minutes or until a skewer comes out with just moist crumbs on it.
11- Remove from the oven and let cool completely before attempting to frost and slice.
Make the Cream Cheese Frosting
1- Beat the room temperature butter and cream cheese together until smooth and combined.
4 oz Cream Cheese,¾ stick Unsalted Butter
2- Add the powdered sugar and mix in slowly, once the dust cloud settles, turn your mixer onto high speed and beat for a few minutes until light and fluffy.
4 cups Powdered Sugar
3- Add the vanilla and beat in for another few seconds.
1 teaspoon Vanilla Extract
4- Spread over the red velvet brownies before slicing.
Notes
I recommend with all my recipes that it’s best to weigh ingredients with a scale for the most accurate measurements and most consistent results. With this recipe, it is especially important that the measurements are accurate as the tiniest tweak in ingredients can hugely impact the texture of the brownies. Just a little too much flour for example can make the brownies have more of a cake-like texture than a chewy brownie texture – so if you can, use a scale!
- Prep Time: PT10M
- Cook Time: PT30M
Nutrition
- Serving Size: 16
- Calories: 367kcal
- Sugar: 51g
- Sodium: 149mg
- Fat: 15g
- Saturated Fat: 9g
- Trans Fat: 0.4g
- Carbohydrates: 57g
- Fiber: 1g
- Protein: 3g
- Cholesterol: 75mg
Table of Contents
What Are Red Velvet Brownies?
Red velvet brownies are a rich and chewy dessert bar that combines the flavor of mild cocoa with a hint of tang from vinegar or buttermilk, topped off with a deep red hue that makes them visually stunning. Unlike traditional chocolate brownies, red velvet versions are slightly less sweet and have a smoother, cake-meets-brownie texture that gives them their unique identity.
They’re not just red brownies. They’re a harmonious blend of subtle chocolate flavor, velvety softness, and just the right level of density to qualify as a brownie rather than cake. Typically, red velvet brownies are finished with a cream cheese frosting or swirled layer, adding both flavor depth and creamy contrast to the fudgy base.
This dessert is ideal for:
- Holiday gatherings (especially Valentine’s Day or Christmas)
- Bake sales
- Gifting
- Everyday indulgence
Origins and Why They’re So Loved
The term “red velvet” traces back to early 20th-century American cuisine, where velvet cakes were known for their smooth, delicate crumb. The red hue became popular during wartime when food coloring was used to make desserts more appealing.
Today, red velvet has become a celebrated dessert flavor across the U.S., appearing in everything from cakes to cookies. Brownies, as a format, give the red velvet profile a dense, compact, and snackable form that’s perfect for everyday enjoyment.
But what makes them so loved? It’s their:
- Eye-catching color
- Comforting flavor
- Customizability
- Smooth texture and chewy bite
Discover great ideas like Chocolate Strawberry Cake if you enjoy flavor combos that blend fruity notes with deep cocoa richness.
Ingredients That Make Red Velvet Brownies Special
Key Ingredients Breakdown
Making red velvet brownies from scratch means choosing the right ingredients to ensure the flavor and texture hit all the right notes. Below are the essential components that define this dessert’s rich profile:
| Ingredient | Purpose |
|---|---|
| Unsalted Butter | Provides richness and moisture; gives brownies that signature dense chew |
| Granulated Sugar | Sweetens and helps create that glossy brownie top |
| Cocoa Powder | Adds the subtle chocolate flavor; Dutch-processed cocoa is often preferred |
| All-Purpose Flour | The main structure-builder; too much can make brownies cakey |
| Eggs | Add structure, moisture, and richness |
| White Vinegar | Reacts with baking soda for slight lift; enhances the “tang” in red velvet |
| Vanilla Extract | Rounds out the flavor and balances sweetness |
| Red Food Coloring | Gives that unmistakable red velvet hue |
| Salt | Enhances the flavor depth and balances sweetness |
Red velvet brownies are all about balance—a bit of chocolate, a splash of vanilla, a touch of acid. You can’t skip any of these ingredients without changing the final product dramatically.
LSI Keywords in Use: moist brownies recipe, best brownie ingredients, fudgy brownies, chewy red velvet brownies
The Role of Cocoa and Vinegar in Flavor and Texture
Many people wonder: Why vinegar in a dessert? In red velvet brownies, vinegar secretly performs its magic in the background.. It reacts with the baking soda and cocoa to create a soft, tender crumb.The acidity also enhances and deepens the vibrant red hue.
Let’s break it down further:
- Cocoa Powder: Red velvet’s chocolate flavor is subtle, not overpowering. That’s why only a small amount of unsweetened cocoa is used. Too much, and you’ll lose that velvet softness.
- Vinegar or Buttermilk: This is the “tang” behind red velvet. It sharpens the flavor and softens the texture. Think of it like adding lemon to a rich dish—it cuts through and lifts the flavor.
These two ingredients are what distinguish red velvet brownies from regular brownies or chocolate cakes.
Don’t miss our Tiramisu Cake if you’re into desserts with surprising layers and complementary flavors.
How to Make Perfect Red Velvet Brownies from Scratch
Step-by-Step Instructions for Homemade Red Velvet Brownies
If you want rich, chewy red velvet brownies with just the right balance of cocoa and moisture, you need to follow a proven process. Here’s a foolproof, easy-to-follow recipe that yields delicious results every time.
Ingredients:
- 1 cup unsalted butter, melted
- 1 ½ cups granulated sugar
- 2 large eggs + 1 egg yolk
- 2 tsp vanilla extract
- 2 tbsp red food coloring
- 1 tsp white vinegar
- ¼ cup unsweetened cocoa powder
- 1 cup all-purpose flour
- ½ tsp salt
Instructions:
- Preheat & Prep
Preheat your oven to 350°F (175°C). Line an 8×8-inch pan with parchment paper for easy removal. - Mix Wet Ingredients
In a large bowl, whisk together the melted butter and sugar until glossy. Add eggs one at a time, followed by the yolk, mixing after each. Mix in the vanilla extract, red food dye, and a splash of vinegar. - Add Dry Ingredients
Sift in the cocoa powder, flour, and salt. Fold gently with a spatula. Don’t overmix—this ensures a chewy, not cakey, brownie. - Pour and Bake
Transfer the batter to your prepared pan and gently level the surface. Bake for 28–32 minutes, or until a toothpick inserted in the center emerges with a few moist crumbs clinging to it. - Cool and Cut
Allow the brownies to cool in the pan for at least 20 minutes. Then, use the parchment to lift them out and cut into squares.
Tips for Perfection:
- Use room temperature eggs for better emulsion.
- If you want a thicker brownie, double the recipe and use the same pan—just increase bake time by 5–7 minutes.
LSI Keywords used: how to make red velvet brownies, moist brownies recipe, chewy red velvet brownies, easy red velvet dessert
Common Mistakes to Avoid During Baking
Even experienced bakers sometimes trip up when baking brownies. Here are the most common red velvet brownie pitfalls—and how to dodge them:
| Mistake | How to Avoid It |
|---|---|
| Overmixing the batter | Mix just until combined—this keeps the brownies tender |
| Using cold eggs or butter | Let ingredients come to room temperature for even mixing |
| Skipping the vinegar | This tangy ingredient is key to that red velvet flavor profile |
| Overbaking | Brownies continue to cook while cooling—don’t wait for dry crumbs |
| Not using parchment paper | Makes removing brownies clean and easy |
Overbaking is especially common. Brownies should be removed when the center is just set—they’ll finish cooking in the pan as they cool.
Looking for inspiration? Try Tres Leches Cake if you love ultra-moist, indulgent desserts with a unique twist.
Best Mix-Ins and Additions for Better Flavor
What Can I Add to Brownie Mix to Make It Taste Better?
Whether you’re using a boxed brownie mix or your favorite homemade recipe, there are plenty of ways to boost flavor and texture in red velvet brownies. These enhancements not only add variety but elevate the overall dessert experience.
Here are some standout additions you can fold into your red velvet brownie batter:
| Add-In | Benefit |
|---|---|
| White Chocolate Chips | Add creamy contrast to the cocoa flavor |
| Chopped Walnuts or Pecans | Add crunch and nutty depth |
| Semi-Sweet Chocolate Chunks | Boost the chocolate factor and fudginess |
| Marshmallows | Create gooey pockets and a nostalgic texture |
| Oreos (crushed) | Add cookies-and-cream crunch and visual contrast |
| Coconut Flakes | Introduce chewy texture with tropical sweetness |
| Espresso Powder | Deepens the cocoa flavor subtly (just 1 tsp!) |
These ingredients can be combined or rotated to create red velvet brownies tailored to your personal taste.
LSI Keywords: fudgy brownies, best brownie ingredients, chewy red velvet brownies, red velvet treat ideas
Creative Additions: Nuts, Chocolate Chips, Cheesecake Swirl
Now let’s talk about layering and presentation. You don’t just have to mix things into the batter—you can create eye-catching and flavor-packed effects by swirling and layering ingredients.
1. Cheesecake Swirl:
Red velvet and cheesecake come together as a perfect dessert pairing made in heaven. To make a simple cheesecake layer:
- Mix 8 oz of cream cheese with ¼ cup sugar, 1 egg yolk, and ½ tsp vanilla extract.
- Drop spoonfuls over your brownie batter and swirl gently with a knife before baking.
2. Nut Topping or Mix-In:
Toast your pecans or walnuts for 5 minutes at 350°F before folding them in.This boosts their crunch and draws out a deeper, more robust flavor.
3. Stuffed Brownies:
Try layering crushed Oreos or chocolate truffles in the center of the batter before baking for a gooey core surprise.
4. Holiday Sprinkles or Colored Sugar:
For seasonal flair, top your brownies with red, white, and green sprinkles (Christmas), heart-shaped confetti (Valentine’s), or spooky sprinkles (Halloween).
These mix-ins and creative touches make your brownies visually fun and deliciously unexpected. They’re perfect for gifting or wowing guests at parties.
Learn more about Romantic Chocolate and Strawberry Cupcakes to find more dessert inspiration for themed occasions.
Red Velvet Cheesecake Brownies
Layering Cheesecake and Brownie for a Gourmet Dessert
If you’re looking to take your red velvet brownies to a whole new level, red velvet cheesecake brownies are the answer. ChatGPT a dit :
This pairing merges the deep, fudgy richness of red velvet with the smooth, tangy creaminess of cheesecake, creating a decadent dessert that tastes straight from a bakery.
Here’s how to make it:
For the Brownie Layer:
Use your standard red velvet brownie recipe (from Part 3).
For the Cheesecake Swirl:
- 8 oz cream cheese, softened
- ¼ cup granulated sugar
- 1 egg yolk
- ½ tsp vanilla extract
Steps:
- Preheat oven to 350°F and prepare your baking pan with parchment paper.
- Evenly spread the red velvet brownie batter into the prepared pan.
- In a separate bowl, beat all the cheesecake ingredients until smooth.
- Spoon dollops of the cheesecake mixture over the red velvet brownie layer.
- Use a knife or skewer to swirl the cheesecake through the batter.
- Bake for 30–35 minutes until the center is set and a toothpick comes out mostly clean.
Pro Tips:
- Don’t over-swirling. You want visual contrast and pockets of flavor.
- Let them chill completely before slicing for cleaner cuts.
This version of red velvet brownies is especially popular for holidays and birthdays—it looks impressive but is surprisingly easy to make.
LSI Keywords: red velvet cheesecake brownies, cream cheese swirl brownies, homemade red velvet dessert
Do Red Velvet Cheesecake Brownies Need to Be Refrigerated?
Yes, they do. Because of the cream cheese layer, red velvet cheesecake brownies must be refrigerated to maintain food safety and texture.
Storage Guidelines:
- Allow brownies to cool completely.
- Seal tightly with plastic wrap or keep in an airtight container for storage.
- Refrigerate for up to 5 days.
Serving Tip:
Let them sit at room temperature for 10–15 minutes before serving for the best taste and consistency.
Skipping refrigeration could cause the cream cheese to spoil or weep, ruining the texture of your beautiful dessert. Trust us—chilled red velvet cheesecake brownies are even better the next day.
Check out Tiramisu Cake if you’re a fan of creamy layers and chilled dessert options.
Texture & Taste Secrets
What Do Red Velvet Brownies Taste Like?
Red velvet brownies offer a flavor that’s subtly rich, slightly tangy, and perfectly balanced. Unlike regular chocolate brownies, they don’t aim for intense chocolate flavor—instead, they deliver a refined cocoa essence enhanced by vanilla and a gentle acidic undertone from vinegar or buttermilk.
Flavor Profile Overview:
- Cocoa: Light but noticeable. Adds depth without overwhelming.
- Vanilla: Balances the cocoa and adds warmth.
- Tanginess: Comes from vinegar or cream cheese swirls—signature to red velvet.
- Sweetness: Not overly sweet. Ideal for those who find chocolate brownies too rich.
- Mouthfeel: Moist, dense, slightly chewy—more structured than cake, but softer than fudge brownies.
When you bite into a red velvet brownie, you’re getting:
- A velvety, tender crumb that effortlessly melts on the tongue.
- Just enough sweetness to satisfy, without being cloying.
- A unique taste you won’t find in typical chocolate desserts.
Ideal For:
People who want something chocolate-adjacent but more elegant. It’s why they’re a favorite at weddings, Valentine’s dinners, and gourmet bake sales.
How to Keep Brownies Soft and Moist for Days
Dry brownies are a tragedy. Here’s how to keep your red velvet brownies fresh and irresistibly chewy:
1. Don’t Overbake
This is the biggest mistake. Always take brownies out when the center is just set. A slightly underbaked center means fudgy magic once cooled.
2. Use the Right Storage Method
- Let brownies cool completely before covering.
- Wrap them in plastic wrap or foil.
- Store them in an airtight container to lock in moisture.
3. Room Temperature or Fridge?
- For plain red velvet brownies: Store at room temp up to 4 days.
- For cream cheese swirl versions: Always refrigerate (up to 5 days).
4. Add a Slice of Bread
Yup—just like with cookies. Place a slice of white bread in the container. It’ll absorb air moisture and keep brownies soft longer.
5. Freeze for Long-Term Storage
- Wrap individual brownies tightly in plastic, then foil.
- Freeze for up to 3 months.
- Thaw at room temp or zap for 10–15 seconds in the microwave.
These tips guarantee that each bite will stay just as soft and rich as the day they were baked.
LSI Keywords: how to keep brownies soft and moist, chewy red velvet brownies, moist brownies recipe, brownie storage tips
Looking for more sweet ideas? Chocolate Strawberry Cake is another layered treat that blends soft textures with bold flavors.
Storage, Shelf Life, and Reheating Tips
How to Store Red Velvet Brownies for Freshness
Keeping your red velvet brownies moist and delicious starts with proper storage. Whether you’re saving leftovers or prepping in advance, these steps will ensure your brownies stay bakery-fresh for days—or even weeks.
Short-Term Storage (1–4 Days):
- Let brownies cool completely before storing.
- Securely wrap them in plastic wrap or aluminum foil to keep them fresh.
- Place them in an airtight container.
- Keep them at room temperature if there’s no cream cheese in the recipe.
Tip: Add a slice of soft bread (like white or sandwich bread) to the container. The bread helps maintain moisture, keeping your brownies soft longer.
Refrigeration (If Cream Cheese Is Included):
- For cheesecake swirled or frosted versions, always refrigerate.
- Place in an airtight container and store for up to 5 days.
- Let refrigerated brownies sit at room temperature for 10–15 minutes before serving for best texture.
Reheating Without Drying Them Out
Whether you’ve stored your brownies in the fridge or freezer, warming them up properly makes a big difference in taste and texture.
How to Reheat Brownies (Without Drying):
| Method | Instructions |
|---|---|
| Microwave | Wrap brownie in a damp paper towel and microwave for 10–15 seconds |
| Oven (Best for Large Batches) | Preheat oven to 300°F, wrap brownies in foil, bake for 8–10 minutes |
| Toaster Oven | Great for crisp edges—reheat at 300°F for 6–8 minutes |
Avoid: Reheating uncovered in a microwave. It dries them out quickly and hardens the edges.
Freezing Tips:
- Freeze individual slices tightly wrapped in plastic wrap and foil.
- Store in a freezer-safe bag or airtight container.
- Thaw overnight in the fridge or 1 hour at room temp.
These methods let you bake in bulk and enjoy red velvet brownies whenever the craving hits—without sacrificing texture or taste.
Don’t miss our Tres Leches Cake for another dessert that stores well and gets better with time.
Red Velvet Brownie Variations and Recipe Twists
Vegan, Gluten-Free, and Low-Sugar Options
The beauty of red velvet brownies is how adaptable they are. Whether you’re baking for dietary restrictions or just looking for a healthier version, there are several ways to modify the classic recipe without sacrificing flavor or texture.
Vegan Red Velvet Brownies
For vegan red velvet brownies that are equally chewy and decadent:
Substitute:
- Eggs → Use flax eggs (1 tbsp ground flaxseed + 3 tbsp water per egg)
- Butter → Use coconut oil or vegan butter
- Cream Cheese (for swirl) → Use dairy-free cream cheese
Pro Tip: Add 2 tbsp dairy-free yogurt or applesauce for extra moisture.
Gluten-Free Red Velvet Brownies
Use a 1:1 gluten-free flour blend that includes xanthan gum. Almond flour may work, but it will make the texture more cake-like and less chewy.
Note: Be careful with cocoa powder—some brands process it in facilities with gluten, so always check labels if you’re strict gluten-free.
Low-Sugar or Sugar-Free Options
- Replace sugar with a blend like monk fruit sweetener or erythritol.
- Use unsweetened applesauce to reduce the overall sugar and fat content.
These alternative recipes are perfect for:
- Health-conscious bakers
- Those managing dietary restrictions
- Holiday parties where you need options for everyone
LSI Keywords: vegan red velvet brownies, gluten-free brownie recipes, low-sugar red velvet dessert, healthy brownie variations
Holiday & Event Variants: Valentine’s, Christmas, and More
Red velvet brownies are made for celebration. With a little creativity, you can customize them for any holiday or special occasion:
| Occasion | Custom Touch |
|---|---|
| Valentine’s Day | Heart-shaped cookie cutters, pink drizzle, edible rose petals |
| Christmas | Red and green sprinkles, white chocolate drizzle |
| Halloween | Swirl in orange cheesecake, top with candy eyeballs |
| Fourth of July | Add blueberries and white chocolate for a red-white-blue theme |
| Birthdays | Funfetti mixed in, vanilla buttercream topping |
Serving Idea: Create a stunning trifle by layering red velvet brownie squares with cream cheese frosting in mini dessert cups.
These tweaks don’t just make your brownies more festive—they also make them more memorable.
Discover great ideas like Romantic Chocolate and Strawberry Cupcakes if you’re planning for themed desserts or a giftable baked treat.
Serving Suggestions and Pairings
Best Ways to Serve Red Velvet Brownies
Serving red velvet brownies can go beyond a simple slice on a plate. How you present and accompany them can elevate the experience and make your dessert feel gourmet—even if it’s homemade.
Here are elegant and fun serving ideas:
- Classic Squares: Cut into uniform squares and top with a light dusting of powdered sugar or a drizzle of white chocolate.
- A la Mode: Serve warm with a scoop of vanilla bean or cream cheese swirl ice cream.
- Dessert Charcuterie Board: Include brownie squares, chocolate-dipped fruits, marshmallows, and pretzels.
- Layered Parfaits: Alternate brownie crumbles with whipped cream or cream cheese frosting in a glass.
- Holiday Platter: Mix with other festive treats like red velvet cookies or cake pops.
Serving Tip: Always use a sharp knife dipped in hot water for clean brownie cuts.
Presentation Tip: For a festive twist on serving red velvet brownies, try assembling them into individual dessert cups with layers of cream cheese frosting. This holiday brownie recipe transforms into an elegant dessert presentation—ideal for showcasing creative red velvet dessert ideas.
Perfect Pairings: Ice Cream, Coffee, Wine
Pairing your red velvet brownies with the right drink or scoop can take things up a notch. Here’s what complements their rich, balanced flavor:
| Pairing | Why It Works |
|---|---|
| Vanilla Ice Cream | Adds creamy contrast and coolness to warm brownies |
| Salted Caramel Drizzle | Balances the cocoa and adds a rich, buttery note |
| Fresh Berries | Introduce brightness and tartness—great with cheesecake swirl brownies |
| Espresso or Dark Roast Coffee | Enhances the mild chocolate flavor in the brownie |
| Red Wine (Cabernet or Merlot) | Pairs well with the richness and soft cocoa undertone |
| Milk or Almond Milk | A classic choice for mellowing out sweetness |
These combinations are ideal for:
- Dinner parties
- Romantic desserts
- Gourmet gift boxes
Pairing your brownies well can create a complete dessert experience, turning a simple bake into an unforgettable treat.
Fore more recipes follow me in Facebook, medium and Pinterest
FAQs
What do red velvet brownies taste like?
They have a soft, chewy texture with a subtle cocoa flavor, balanced by vanilla and a light tang from vinegar or cream cheese. The result is a rich yet refined taste that isn’t overly sweet.
What can I add to brownie mix to make it taste better?
Try white or dark chocolate chips, crushed Oreos, toasted nuts, or a cheesecake swirl. You can also enhance flavor with espresso powder or vanilla bean paste.
Do red velvet cheesecake brownies need to be refrigerated?
Yes. Because of the cream cheese layer, these brownies should be stored in the refrigerator and consumed within 4–5 days.
How do you keep brownies soft and moist?
Avoid overbaking, store them in an airtight container, and use a slice of bread to maintain moisture. You can also refrigerate or freeze them for long-term storage.